優れたNest.jsブログを構築する:ユーザーシステムを追加する
Wenhao Wang
Dev Intern · Leapcell
前のチュートリアルで、記事の作成をサポートする基本的なブログを構築しました。
しかし、危険なのは、このブログには認証機能がなく、誰でも記事を作成または削除できることです。
今後のチュートリアルでは、ユーザーおよび認証システムを段階的に追加することで、このブログをより安全にします。
早速始めましょう。
認証方法の紹介
Web開発において、最も一般的な認証方法は、トークンベース(例:JWT) と セッションベース(Cookie) の2つです。
- JWT(JSON Web Tokens): これは今日最も人気のある認証方法です。ユーザーがログインした後、サーバーはトークンを生成し、クライアントに返します。クライアントは後続のリクエストでこのトークンを含め、サーバーはトークンが改ざんされていないことを検証するだけです。サーバーはユーザーのログイン状態を保存しないため、この方法は多数のサーバーを持つ現代の大規模ウェブサイトに非常に適しています。これは、複数のサーバー間でユーザー状態の頻繁な同期の必要性を回避するためです。
- セッション-Cookie: ユーザーがログインした後、サーバーはセッションを作成し、Cookieを介してセッションIDをブラウザに返します。ブラウザは後続のリクエストでこのCookieを自動的に含めます。サーバーはCookieからセッションIDを使用して、保存されている対応するセッション情報を見つけ、それによってユーザーを識別します。
このチュートリアルでは、セッション-Cookie方式を選択します。私たちのブログは、従来のアーキテクチャを持つシンプルなアプリケーションです。認証にセッション-Cookieを使用することは、最も直接的で、古典的で、安全なアプローチです。Nest.jsもこれに優れた組み込みサポートを提供しています。
ユーザーモジュールの作成
認証に取り組む前に、まずユーザーシステムを追加しましょう。
前のチュートリアルでpostsモジュールを作成したのと同様に、Nest CLIを使用して必要なファイルを迅速に生成します。
nest generate module users
nest generate controller users
nest generate service users
次に、データベースのusersテーブルにマッピングするために、src/usersディレクトリにユーザーエンティティファイルuser.entity.tsを作成します。
// src/users/user.entity.ts
import { Entity, Column, PrimaryGeneratedColumn } from 'typeorm';

@Entity()
export class User {
  @PrimaryGeneratedColumn('uuid')
  id: string;

  @Column({ unique: true })
  username: string;

  @Column()
  password: string; // 保存されるパスワードは暗号化されます
}
UsersModule(src/users/users.module.ts)で、TypeOrmModuleを登録してUserエンティティを操作できるようにします。後で他のモジュール(Authモジュールなど)で使用できるようにUsersServiceをエクスポートする必要があることに注意してください。
// src/users/users.module.ts
import { Module } from '@nestjs/common';
import { TypeOrmModule } from '@nestjs/typeorm';
import { UsersController } from './users.controller';
import { UsersService } from './users.service';
import { User } from './user.entity';

@Module({
  imports: [TypeOrmModule.forFeature([User])],
  controllers: [UsersController],
  providers: [UsersService],
  exports: [UsersService], // 他のモジュールで使用するためにUsersServiceをエクスポート
})
export class UsersModule {}
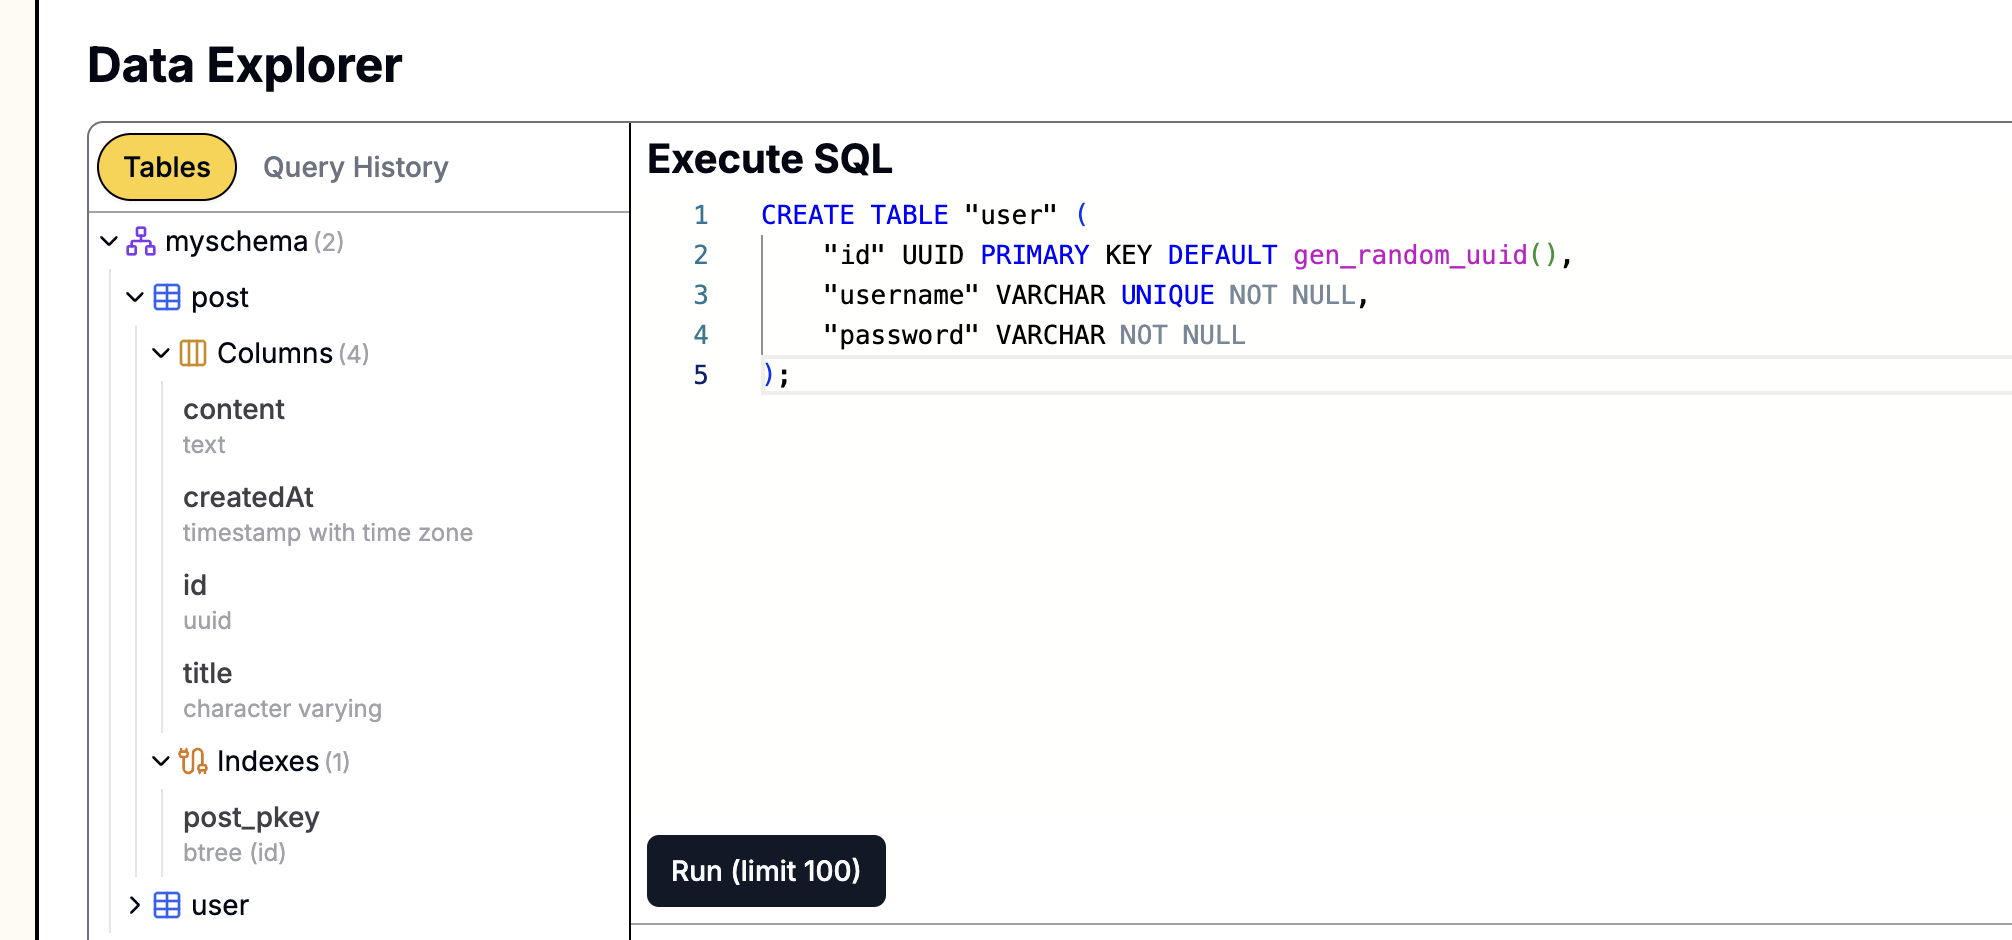
最後に、最後のチュートリアルで作成したPostgreSQLデータベースで次のSQLステートメントを実行して、userテーブルを作成します。
CREATE TABLE "user" (
    "id" UUID PRIMARY KEY DEFAULT gen_random_uuid(),
    "username" VARCHAR UNIQUE NOT NULL,
    "password" VARCHAR NOT NULL
);
Leapcellでデータベースを作成した場合、

グラフィカルインターフェイスを使用してSQLステートメントを簡単に実行できます。ウェブサイトのデータベース管理ページにアクセスし、上記のステートメントをSQLインターフェイスに貼り付けて実行するだけです。
ユーザー登録の実装
src/users/users.service.tsを修正して、ユーザーの作成と検索のロジックを追加します。
注意:セキュリティのため、ユーザーパスワードはデータベースに保存される前に暗号化する必要があります。パスワード暗号化にはbcryptライブラリを使用します。
必要な依存関係をインストールします。
npm install bcrypt
npm install -D @types/bcrypt
// src/users/users.service.ts
import { Injectable } from '@nestjs/common';
import { InjectRepository } from '@nestjs/typeorm';
import { Repository } from 'typeorm';
import { User } from './user.entity';
import * as bcrypt from 'bcrypt';

@Injectable()
export class UsersService {
  constructor(
    @InjectRepository(User)
    private usersRepository: Repository<User>
  ) {}

  async create(user: Partial<User>): Promise<User> {
    const saltRounds = 10;
    const hashedPassword = await bcrypt.hash(user.password || '', saltRounds);

    const newUser = this.usersRepository.create({
      username: user.username,
      password: hashedPassword,
    });

    return this.usersRepository.save(newUser);
  }

  async findOne(username: string): Promise<User | null> {
    return this.usersRepository.findOneBy({ username });
  }
}
Authモジュールとログインロジック検証の作成
すべての認証関連ロジックは、個別のauthモジュールに配置します。まず、コアとなる「ユーザー検証」ロジックのみを実装します。
CLIを使用してauthモジュールとserviceを作成します。
nest generate module auth
nest generate service auth
src/auth/auth.service.tsを修正して、ユーザー名とパスワードが正しいかどうかを確認するためのvalidateUserメソッドを追加します。
// src/auth/auth.service.ts
import { Injectable } from '@nestjs/common';
import { UsersService } from '../users/users.service';
import * as bcrypt from 'bcrypt';

@Injectable()
export class AuthService {
  constructor(private usersService: UsersService) {}

  async validateUser(username: string, pass: string): Promise<any> {
    const user = await this.usersService.findOne(username);
    if (user && (await bcrypt.compare(pass, user.password))) {
      const { password, ...result } = user;
      return result; // 検証成功、パスワードなしでユーザー情報を返す
    }
    return null; // 検証失敗
  }
}
次に、AuthServiceがUsersServiceを使用できるように、AuthModuleにUsersModuleをインポートします。
// src/auth/auth.module.ts
import { Module } from '@nestjs/common';
import { AuthService } from './auth.service';
import { UsersModule } from '../users/users.module';

@Module({
  imports: [UsersModule],
  controllers: [AuthController],
  providers: [AuthService],
})
export class AuthModule {}
ログインおよび登録ページの作成
ユーザーインタラクションのためのインターフェイスを提供する必要があります。viewsフォルダにlogin.ejsとregister.ejsを作成します。
register.ejs
<%- include('_header', { title: 'Register' }) %>

<form action="/users/register" method="POST" class="post-form">
  <h2>Register</h2>
  <div class="form-group">
    <label for="username">Username</label>
    <input type="text" id="username" name="username" required />
  </div>
  <div class="form-group">
    <label for="password">Password</label>
    <input type="password" id="password" name="password" required />
  </div>
  <button type="submit">Register</button>
</form>

<%- include('_footer') %>
login.ejs
<%- include('_header', { title: 'Login' }) %>

<form action="/auth/login" method="POST" class="post-form">
  <h2>Login</h2>
  <div class="form-group">
    <label for="username">Username</label>
    <input type="text" id="username" name="username" required />
  </div>
  <div class="form-group">
    <label for="password">Password</label>
    <input type="password" id="password" name="password" required />
  </div>
  <button type="submit">Login</button>
</form>

<%- include('_footer') %>
ルーティングとコントローラーロジックの実装
次に、登録およびログインリクエストを処理するルートを作成します。
登録ルート
登録ページの表示とフォーム投稿を処理するようにsrc/users/users.controller.tsを更新します。
// src/users/users.controller.ts
import { Controller, Get, Post, Render, Body, Res } from '@nestjs/common';
import { UsersService } from './users.service';
import { Response } from 'express';

@Controller('users')
export class UsersController {
  constructor(private readonly usersService: UsersService) {}

  @Get('register')
  @Render('register')
  showRegisterForm() {
    return;
  }

  @Post('register')
  async register(@Body() body: any, @Res() res: Response) {
    // 簡単のため、複雑な検証はありません
    await this.usersService.create(body);
    res.redirect('/auth/login'); // 登録成功後にログインページにリダイレクト
  }
}
ログイン検証ルート
ログインリクエストを処理する新しいauth.controller.tsを作成します。
nest generate controller auth
src/auth/auth.controller.tsを編集します。ここでvalidateUserメソッドを呼び出します。検証が成功した場合、ブログのホームページにリダイレクトします。
失敗した場合、簡単のため、現時点では特別に処理しません。実際のアプリケーションでは、通常、エラーメッセージを返します。
// src/auth/auth.controller.ts
import { Controller, Get, Post, Render, Body, Res, UnauthorizedException } from '@nestjs/common';
import { AuthService } from './auth.service';
import { Response } from 'express';

@Controller('auth')
export class AuthController {
  constructor(private authService: AuthService) {}

  @Get('login')
  @Render('login')
  showLoginForm() {
    return;
  }

  @Post('login')
  async login(@Body() body: any, @Res() res: Response) {
    const user = await this.authService.validateUser(body.username, body.password);
    if (!user) {
      throw new UnauthorizedException();
    }
    // 検証成功
    res.redirect('/posts');
  }
}
最後に、app.module.tsにUsersModuleとAuthModuleをインポートします。
// src/app.module.ts
// ... imports
import { UsersModule } from './users/users.module';
import { AuthModule } from './auth/auth.module';

@Module({
  imports: [
    // ... TypeOrmModule.forRoot(...)
    PostsModule,
    UsersModule,
    AuthModule,
  ],
  // ...
})
export class AppModule {}
この時点で、基本的なユーザー登録システムとログインロジック検証が完了しました。ユーザーはアカウントを作成でき、アプリケーションはユーザーを識別できます。
テストしてみましょう。プロジェクトを開始します。
npm run start:dev
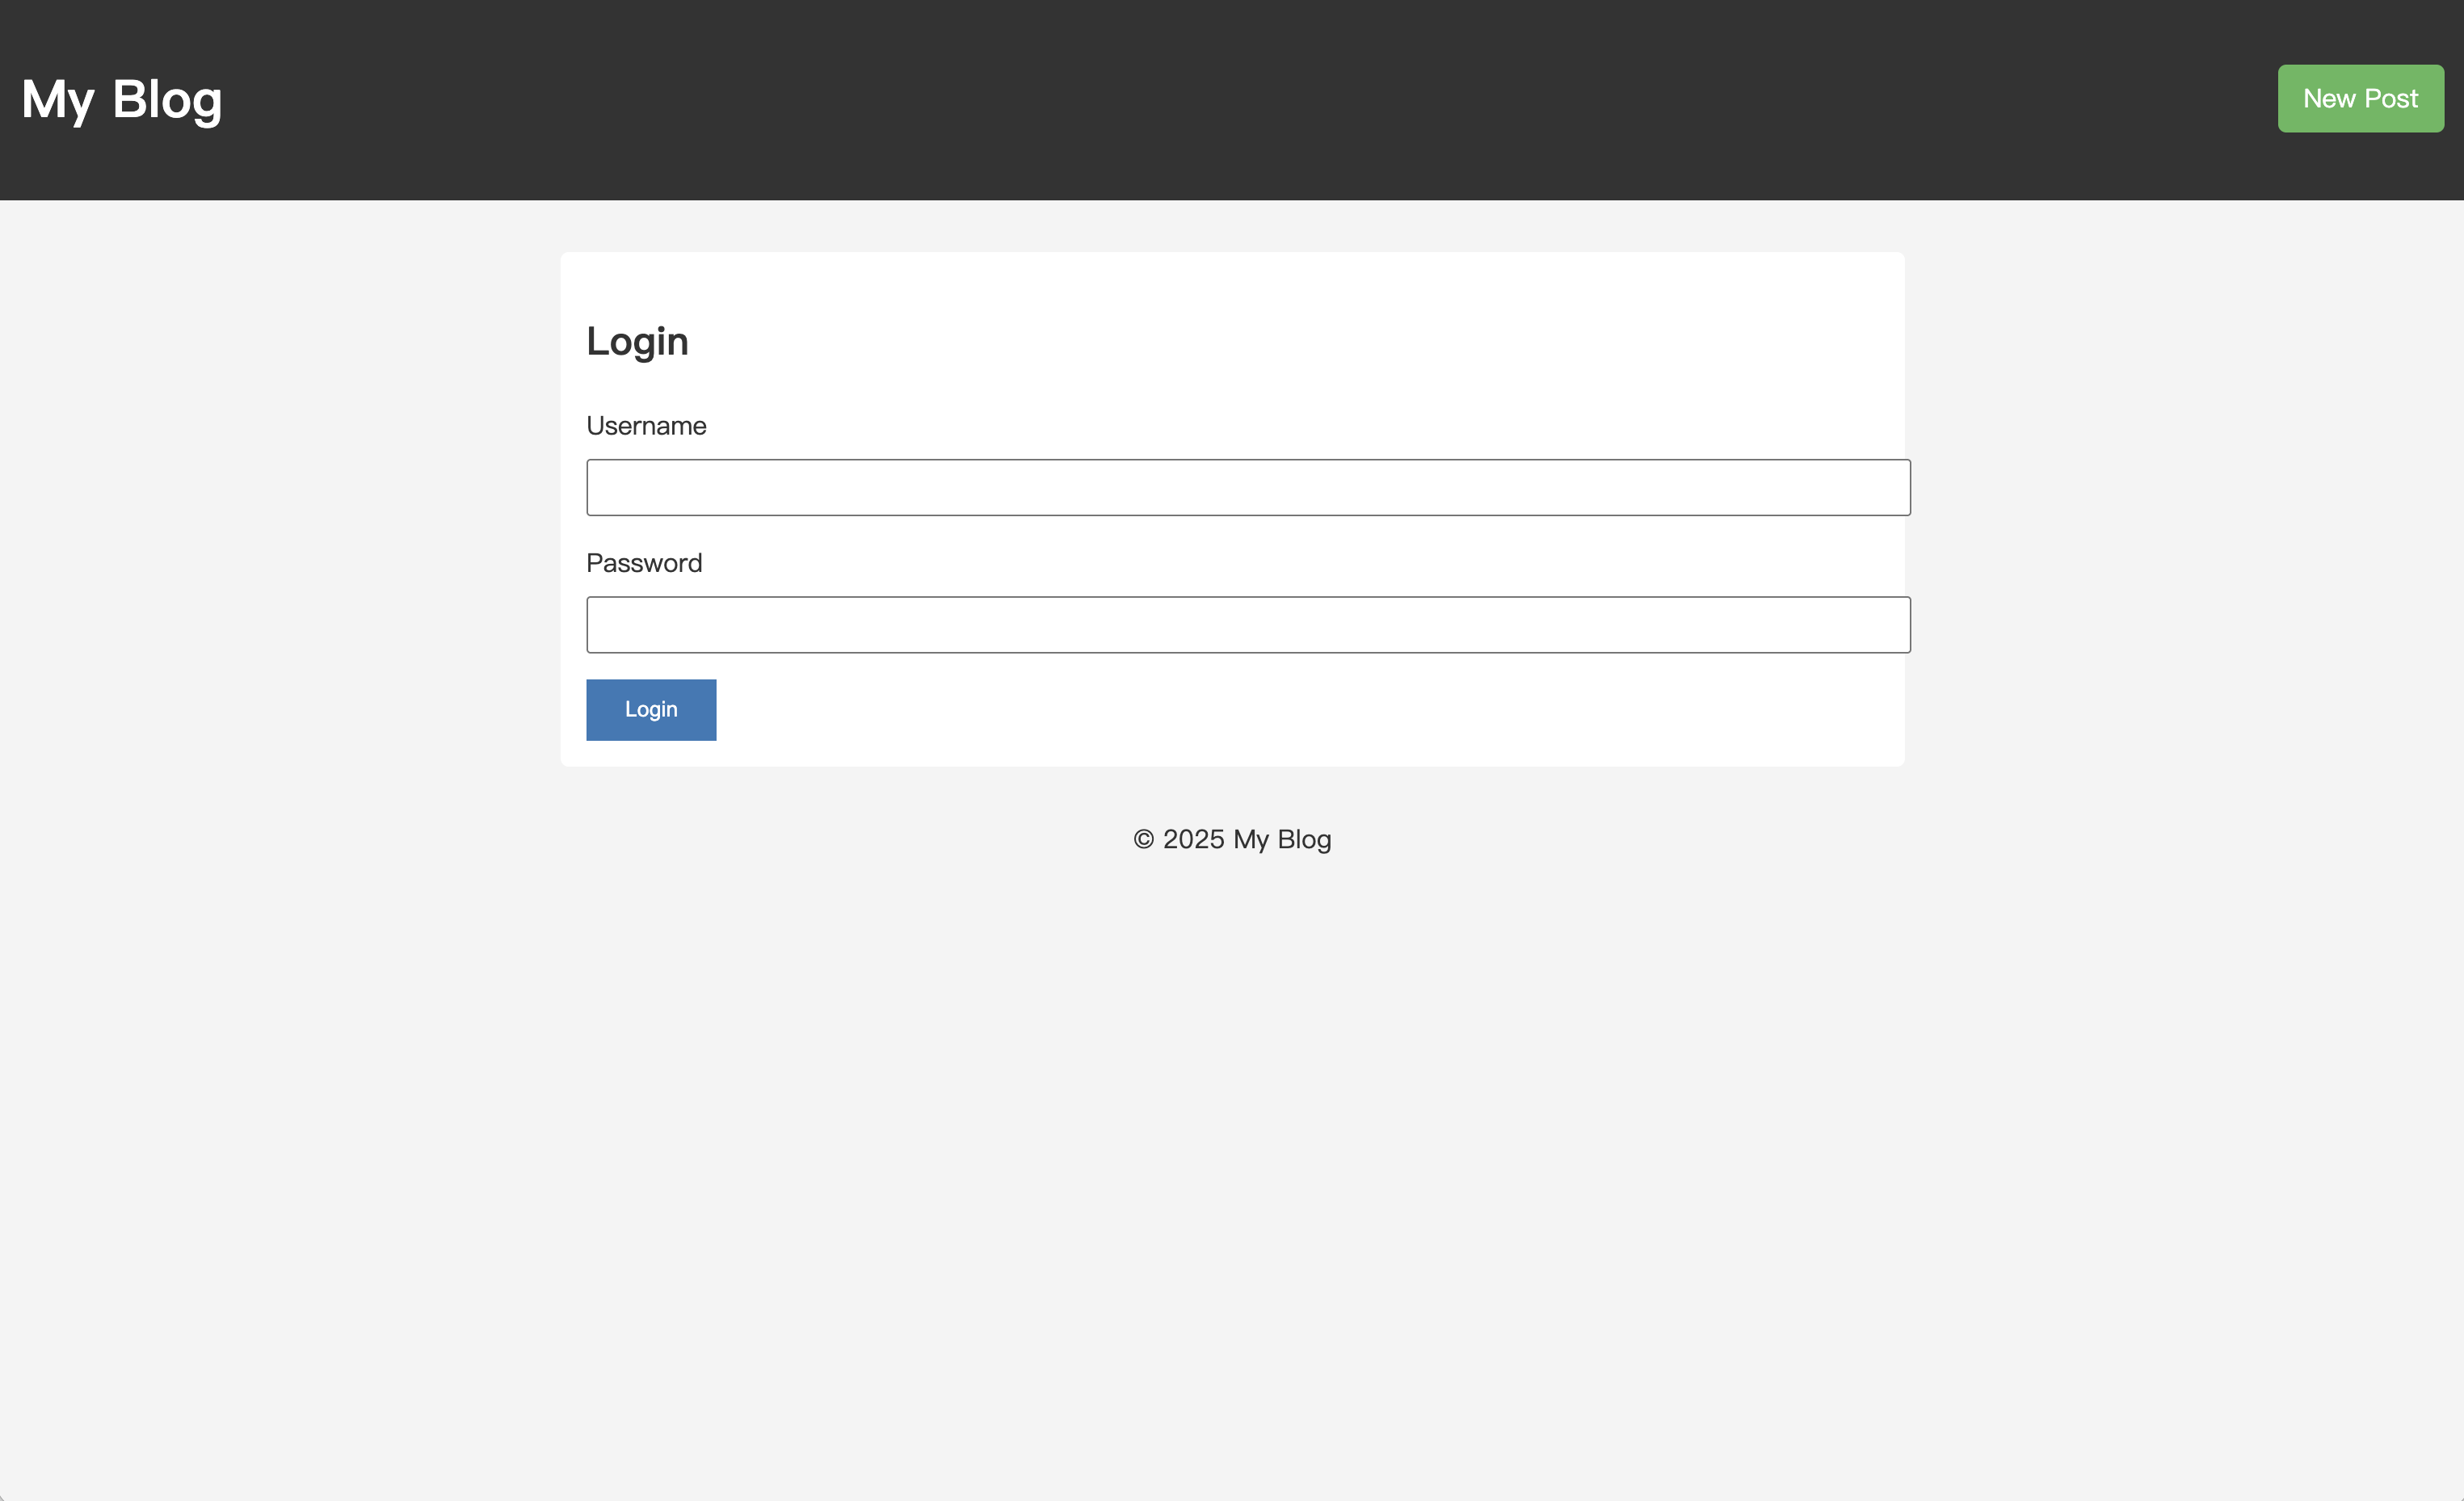
登録するにはhttp://localhost:3000/users/registerにアクセスします。

登録が成功すると、ログインするためにhttp://localhost:3000/auth/loginに自動的にリダイレクトされます。
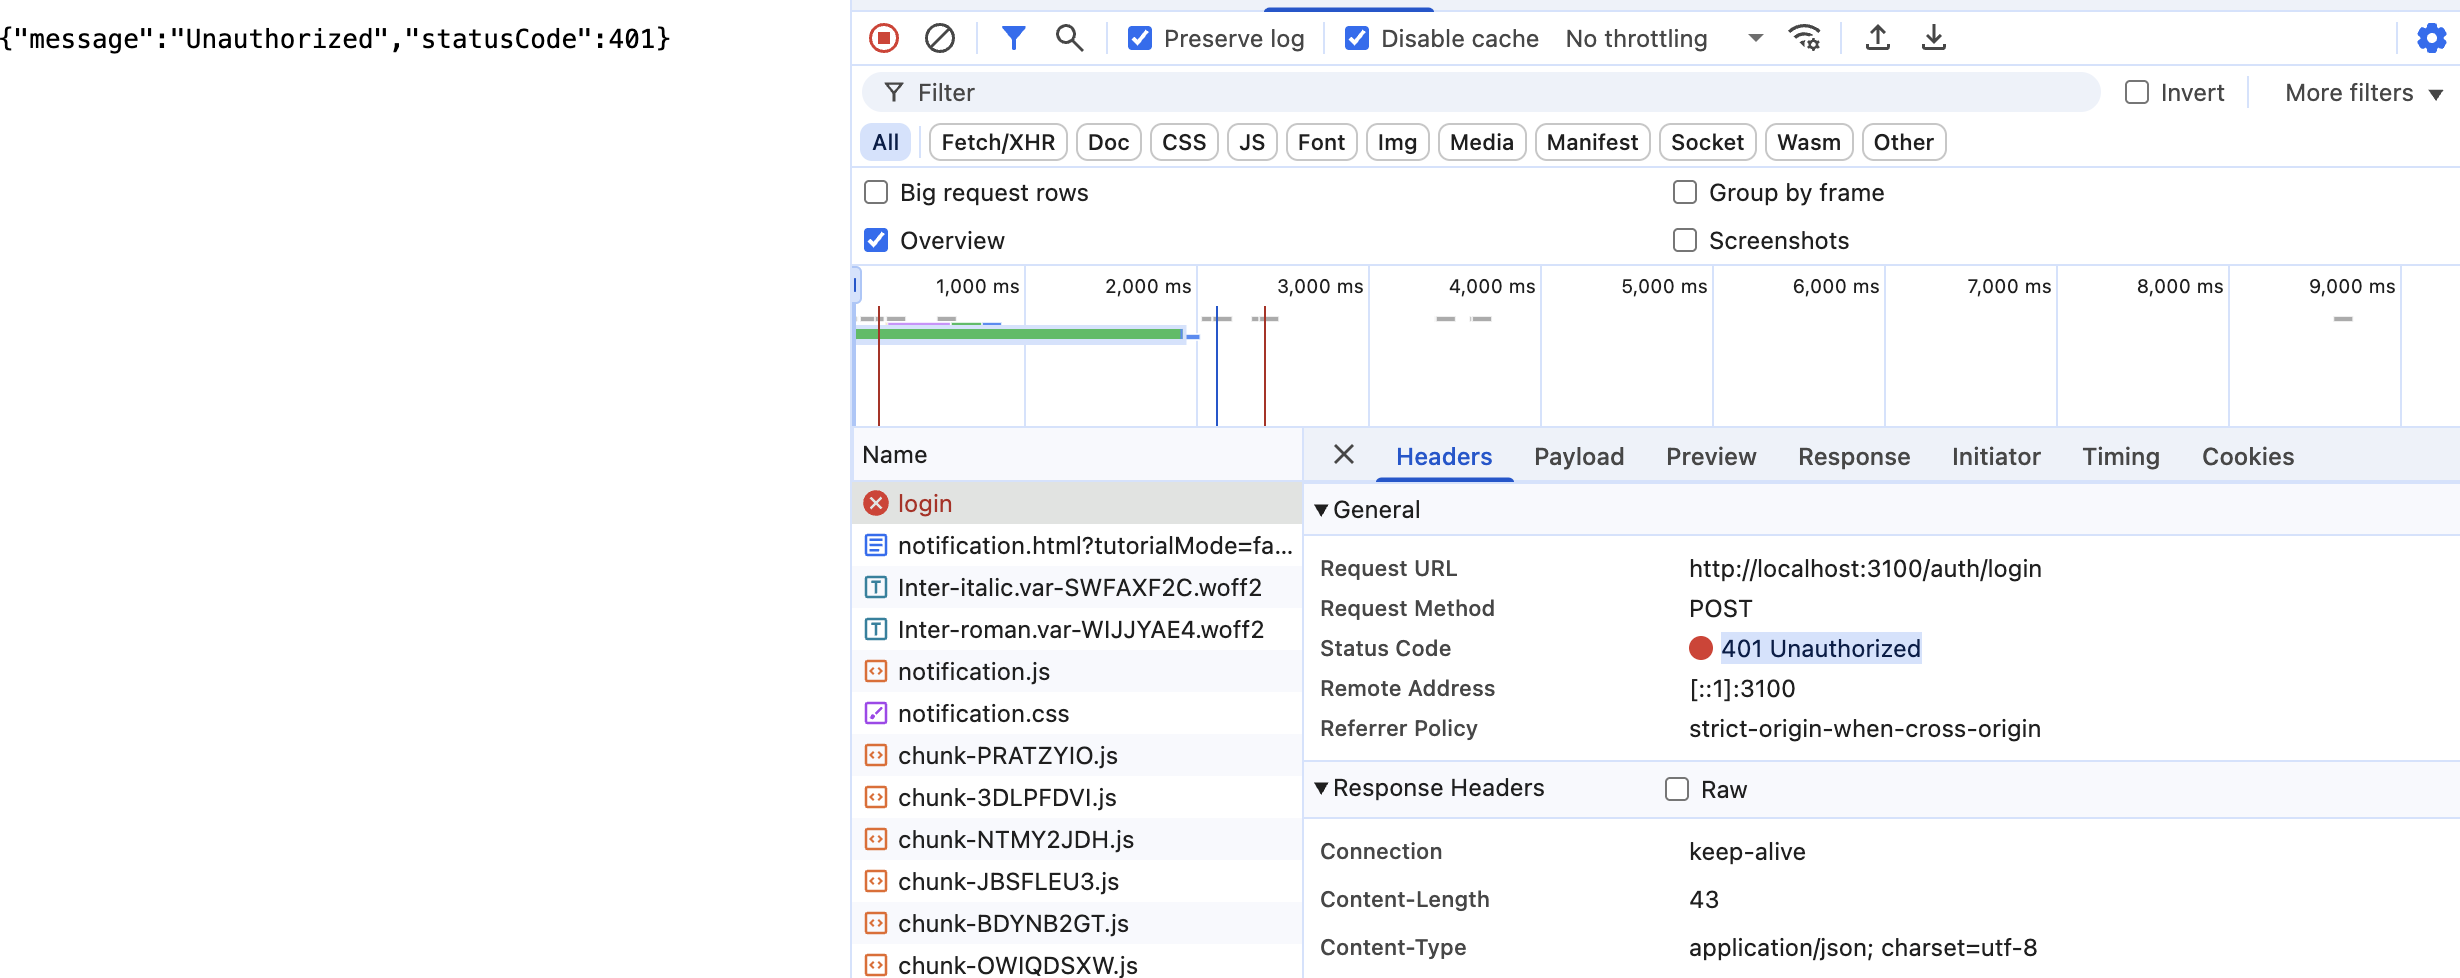
正しい資格情報と間違った資格情報を入力した場合の結果をテストできます。たとえば、間違った情報を入力すると、401 Unauthorizedエラーが表示されます。
ただし、現在のログインは単なる一時的なプロセスであり、 login認証フローを体験するためだけのものです。サーバーはユーザーのログイン状態を覚えていません。
次の記事では、真のユーザーセッション永続化を実現し、ユーザー権限に基づいてページや機能へのアクセスを制限するために、ログイン認証ロジックを完成させます。
過去のチュートリアル: