훌륭한 Nest.js 블로그 만들기: 댓글 답글
Wenhao Wang
Dev Intern · Leapcell
이전 글에서는 블로그에 댓글 기능을 추가하여 독자들이 게시물에 대한 의견을 공유할 수 있도록 했습니다.
하지만 이 댓글들은 단방향입니다. 다른 사람들이 당신의 게시물에 댓글을 달 수는 있지만, 당신은 그들의 댓글에 답글을 달 수 없습니다.
댓글 섹션을 더 인터랙티브하게 만들기 위해, 이 글에서는 댓글 답글 기능을 구현할 것입니다. 사용자는 기존 댓글에 답글을 달 수 있으며, 이 답글들은 중첩(또는 들여쓰기) 형식으로 표시되어 답글 계층 구조를 보여줄 것입니다.
단계 1: 데이터 모델 업데이트
답글 기능을 구현하려면 댓글 사이에 부모-자식 관계를 설정해야 합니다. 답글은 본질적으로 댓글 자체이지만, "부모 댓글"을 가집니다. Comment 엔티티에 자체 참조 관계를 추가하여 이를 달성할 것입니다.
데이터베이스 테이블 수정
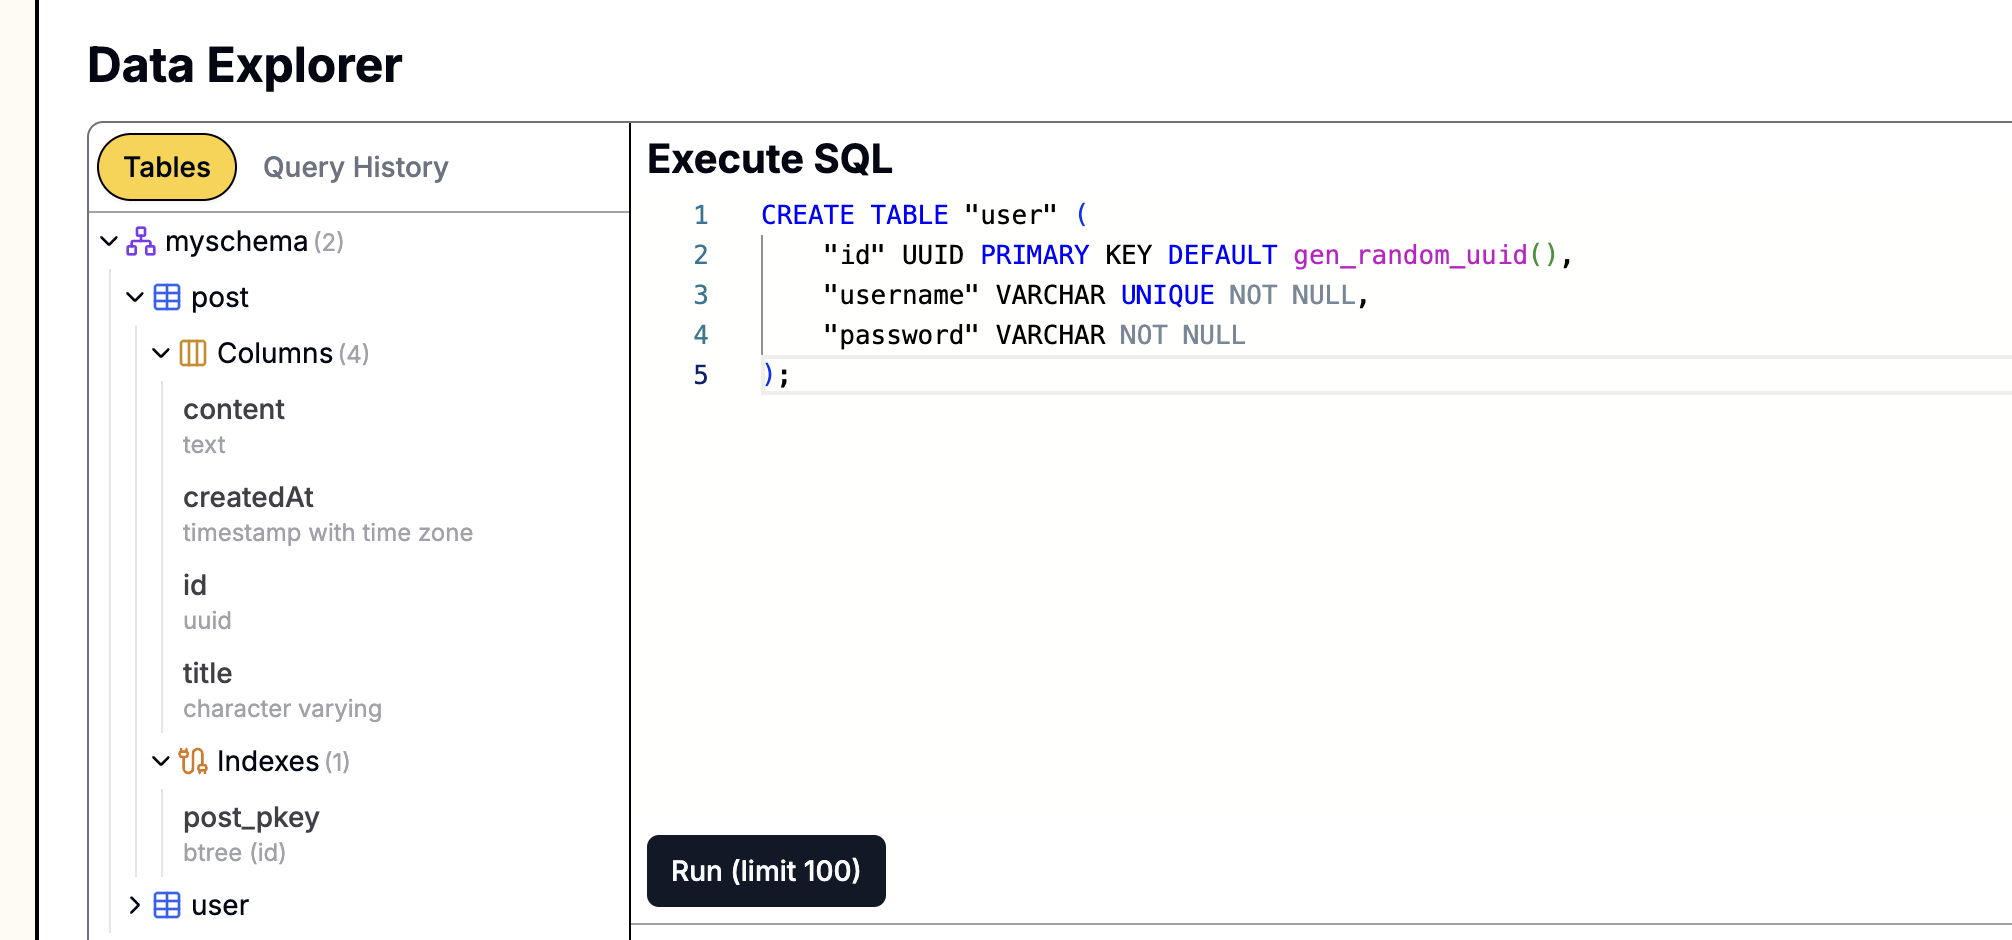
먼저, comment 테이블의 구조를 수정하여 parentId 필드를 추가해 parentId 필드가 부모 댓글의 ID를 가리키도록 하겠습니다.
PostgreSQL 데이터베이스에서 다음 ALTER TABLE 문을 실행하십시오:
ALTER TABLE "comment"
ADD COLUMN "parentId" UUID REFERENCES "comment"("id") ON DELETE CASCADE;
parentId열은 선택 사항입니다 (NULL허용) 왜냐하면 최상위 댓글에는 부모가 없기 때문입니다.REFERENCES "comment"("id")는parentId를 동일한 테이블의id열에 연결하는 외래 키를 생성합니다.
Leapcell에서 데이터베이스를 생성한 경우,

그래픽 인터페이스를 사용하여 SQL 문을 쉽게 실행할 수 있습니다. 웹사이트의 데이터베이스 관리 페이지로 이동하여 위의 문을 SQL 인터페이스에 붙여넣고 실행하기만 하면 됩니다.
댓글 엔티티 업데이트
src/comments/comment.entity.ts 파일을 열고 이 계층적 관계를 코드에 반영하기 위해 parent 및 replies 속성을 추가하십시오.
// src/comments/comment.entity.ts
import { Entity, Column, PrimaryColumn, CreateDateColumn, ManyToOne, OneToMany } from 'typeorm';
import { User } from '../users/user.entity';
import { Post } from '../posts/post.entity';

@Entity()
export class Comment {
  @PrimaryColumn({ type: 'uuid', default: () => 'gen_random_uuid()' })
  id: string;

  @Column('text')
  content: string;

  @CreateDateColumn()
  createdAt: Date;

  @ManyToOne(() => User, (user) => user.comments)
  user: User;

  @ManyToOne(() => Post, (post) => post.comments)
  post: Post;

  // --- New Fields ---

  @ManyToOne(() => Comment, (comment) => comment.replies, { nullable: true })
  parent: Comment; // Parent comment

  @OneToMany(() => Comment, (comment) => comment.parent)
  replies: Comment[]; // List of child comments (replies)
}
단계 2: 댓글 서비스 조정
서비스 계층은 새 댓글을 생성할 때 부모 댓글을 연결하고, 쿼리할 때 댓글의 평면 목록을 트리와 같은 구조로 구성하도록 조정해야 합니다.
src/comments/comments.service.ts를 열고 다음 변경 사항을 적용하십시오.
// src/comments/comments.service.ts
import { Injectable } from '@nestjs/common';
import { InjectRepository } from '@nestjs/typeorm';
import { Repository } from 'typeorm';
import { Comment } from './comment.entity';
import { Post } from '../posts/post.entity';
import { User } from '../users/user.entity';

@Injectable()
export class CommentsService {
  constructor(
    @InjectRepository(Comment)
    private commentsRepository: Repository<Comment>
  ) {}

  // findByPostId 메서드 수정
  async findByPostId(postId: string): Promise<Comment[]> {
    const comments = await this.commentsRepository.find({
      where: { post: { id: postId } },
      relations: ['user', 'parent'], // 사용자 및 부모를 동시에 로드
      order: {
        createdAt: 'ASC',
      },
    });
    return this.structureComments(comments);
  }

  // 평면 목록을 트리 구조로 변환하는 새 비공개 메서드 추가
  private structureComments(comments: Comment[]): Comment[] {
    const commentMap = new Map<string, Comment>();
    comments.forEach((comment) => {
      comment.replies = []; // replies 배열 초기화
      commentMap.set(comment.id, comment);
    });

    const rootComments: Comment[] = [];
    comments.forEach((comment) => {
      if (comment.parent) {
        const parentComment = commentMap.get(comment.parent.id);
        if (parentComment) {
          parentComment.replies.push(comment);
        }
      } else {
        rootComments.push(comment);
      }
    });

    return rootComments;
  }

  // 선택적 parentId를 허용하도록 create 메서드 수정
  async create(content: string, user: User, post: Post, parentId?: string): Promise<Comment> {
    const newComment = this.commentsRepository.create({
      content,
      user,
      post,
      parent: parentId ? ({ id: parentId } as Comment) : undefined,
    });
    return (await this.commentsRepository.save([newComment]))[0];
  }
}
논리 설명:
findByPostId는 이제 게시물의 모든 댓글(최상위 댓글 및 모든 답글 포함)을 가져옵니다.- 새로운
structureComments메서드는 로직의 핵심입니다. 모든 댓글을 반복합니다. 댓글에parent가 있는 경우, 부모 댓글의replies배열에 배치되고, 그렇지 않으면 최상위 댓글이 됩니다. create메서드에는 이제 선택적parentId매개변수가 있습니다. 이 ID가 제공되면 새로 생성된 댓글은 해당 부모 댓글과 연결됩니다.
단계 3: 컨트롤러 업데이트
컨트롤러는 요청 본문에서 선택적 parentId를 수신하고 이를 서비스에 전달해야 합니다. 이 변경은 매우 간단합니다.
src/comments/comments.controller.ts를 열십시오:
// src/comments/comments.controller.ts
import { Controller, Post, Body, Param, Req, Res, UseGuards } from '@nestjs/common';
// ... imports

@Controller('posts/:postId/comments')
export class CommentsController {
  constructor(private readonly commentsService: CommentsService) {}

  @UseGuards(AuthenticatedGuard)
  @Post()
  async create(
    @Param('postId') postId: string,
    @Body('content') content: string,
    @Body('parentId') parentId: string, // <-- parentId 수신
    @Req() req: Request,
    @Res() res: Response
  ) {
    const { user } = req.session as any;

    // 서비스에 parentId 전달
    await this.commentsService.create(content, user, { id: postId } as any, parentId);

    res.redirect(`/posts/${postId}`);
  }
}
단계 4: 프론트엔드 뷰 업그레이드
이것이 가장 많은 변경이 있는 부분입니다. 댓글과 답글을 재귀적으로 렌더링하도록 post.ejs 템플릿을 업데이트해야 합니다. 또한 답글 양식을 동적으로 표시하는 JavaScript를 추가해야 합니다.
댓글 템플릿 생성
댓글의 재귀적 렌더링을 달성하려면 재사용 가능한 "부분" 템플릿을 만드는 것이 가장 좋습니다.
views 디렉토리에 _comment.ejs라는 새 파일을 만듭니다.
<% comments.forEach(comment => { %>
<div class="comment-item" style="margin-left: <%= depth * 20 %>px;">
  <p class="comment-content"><%= comment.content %></p>
  <small>
    By <strong><%= comment.user.username %></strong> on <%= new Date(comment.createdAt).toLocaleDateString() %>
  </small>
  <% if (user) { %>
  <button class="reply-btn" data-comment-id="<%= comment.id %>">Reply</button>
  <% } %>
</div>

<% if (comment.replies && comment.replies.length > 0) { %>
  <%- include('_comment', { comments: comment.replies, user: user, post: post, depth: depth + 1 }) %>
<% } %>
<% })
이 템플릿은 전달된 comments 배열을 반복하고 각 댓글의 replies 배열에 대해 재귀적으로 자신을 호출하며, depth를 증가시켜 스타일링된 들여쓰기를 달성합니다.
post.ejs 업데이트
이제 views/post.ejs를 수정하여 이 새로운 _comment.ejs 부분을 사용하고 범용 답글 양식을 추가합니다.
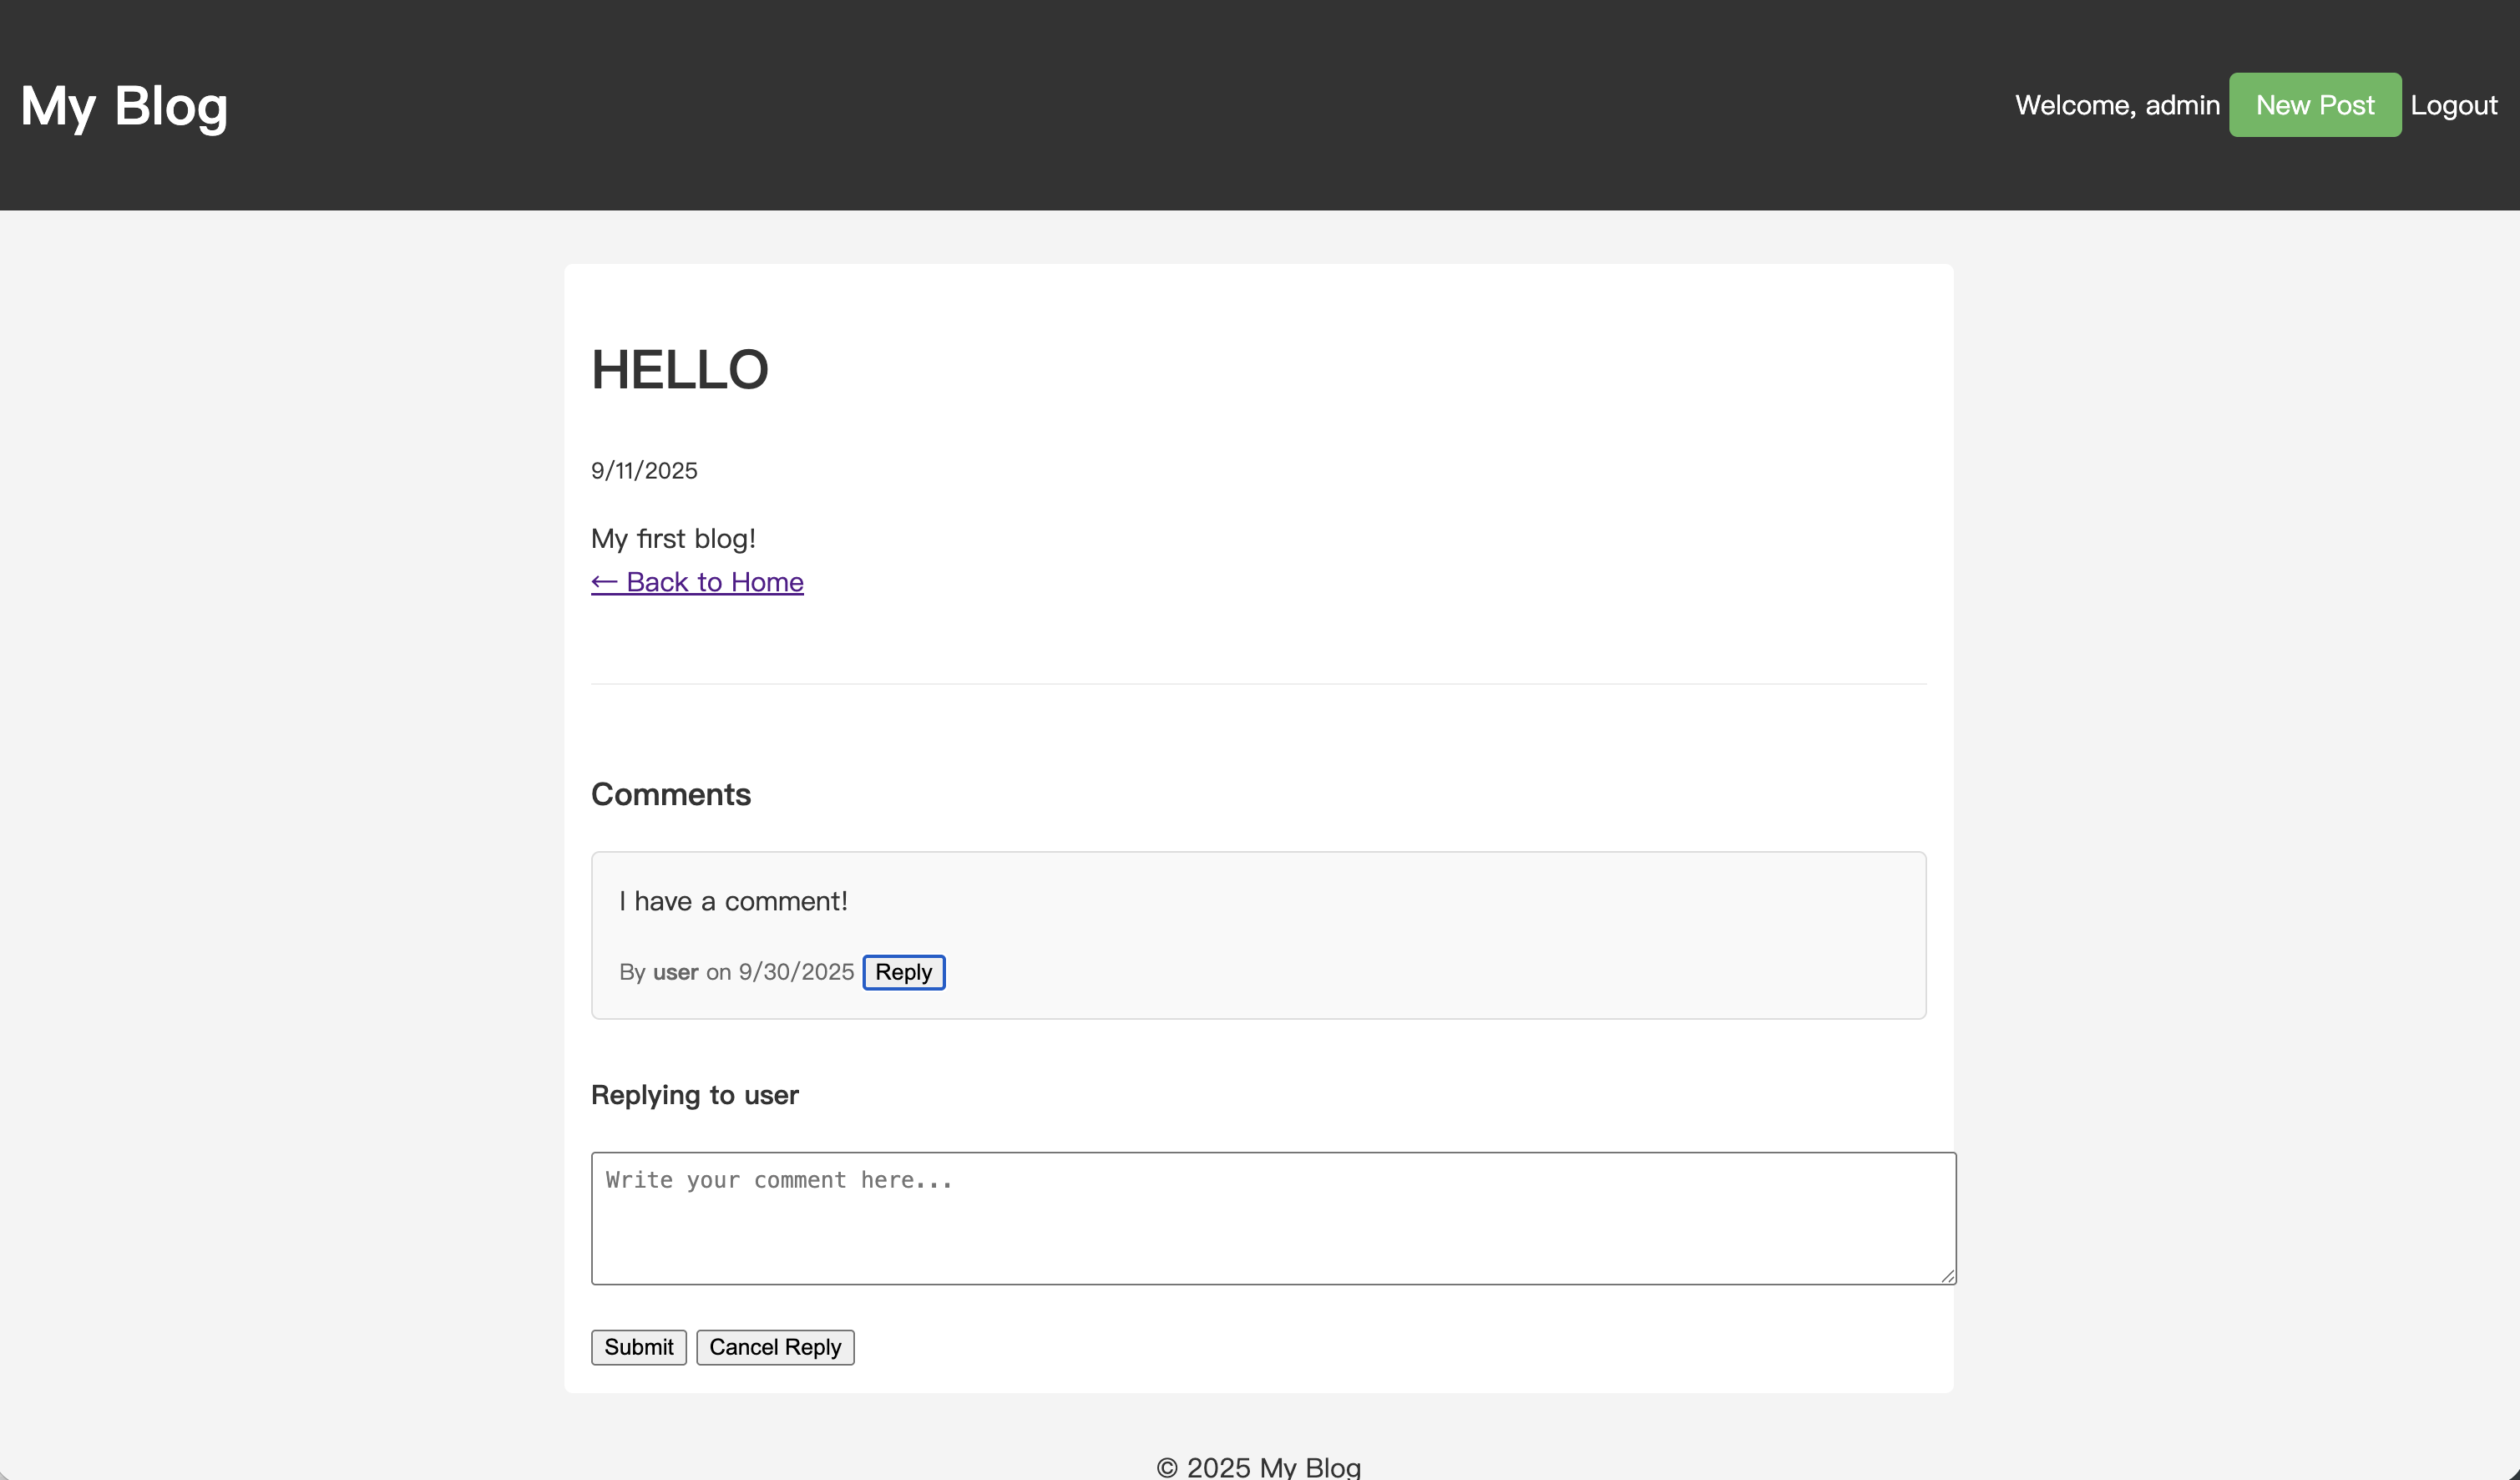
<section class="comments-section">
  <h3>Comments</h3>

  <div class="comment-list">
    <% if (comments.length > 0) { %>
      <%- include('_comment', { comments: comments, user: user, post: post, depth: 0 }) %>
    <% } else { %>
    <p>No comments yet. Be the first to comment!</p>
    <% } %>
  </div>

  <% if (user) { %>
  <form id="comment-form" action="/posts/<%= post.id %>/comments" method="POST" class="comment-form">
    <h4>Leave a Comment</h4>
    <div class="form-group">
      <textarea name="content" rows="4" placeholder="Write your comment here..." required></textarea>
      <input type="hidden" name="parentId" id="parentIdInput" value="" />
    </div>
    <button type="submit">Submit</button>
    <button type="button" id="cancel-reply-btn" style="display: none;">Cancel Reply</button>
  </form>
  <% } else { %>
  <p><a href="/auth/login">Login</a> to leave a comment.</p>
  <% } %>
</section>

<script>
  document.addEventListener('DOMContentLoaded', () => {
    const commentForm = document.getElementById('comment-form');
    const parentIdInput = document.getElementById('parentIdInput');
    const formTitle = commentForm.querySelector('h4');
    const cancelReplyBtn = document.getElementById('cancel-reply-btn');
    const commentList = document.querySelector('.comment-list');

    commentList.addEventListener('click', (e) => {
      if (e.target.classList.contains('reply-btn')) {
        const commentId = e.target.getAttribute('data-comment-id');
        const commentItem = e.target.closest('.comment-item');

        // 답글을 다는 댓글 바로 아래로 양식 이동
        commentItem.after(commentForm);

        // parentId 및 양식 제목 설정
        parentIdInput.value = commentId;
        formTitle.innerText = 'Replying to ' + commentItem.querySelector('strong').innerText;
        cancelReplyBtn.style.display = 'inline-block';
      }
    });

    cancelReplyBtn.addEventListener('click', () => {
      // 양식 상태 재설정
      parentIdInput.value = '';
      formTitle.innerText = 'Leave a Comment';
      cancelReplyBtn.style.display = 'none';

      // 양식을 댓글 섹션 맨 아래로 다시 이동
      document.querySelector('.comments-section').appendChild(commentForm);
    });
  });
</script>

<%- include('_footer') %>
논리 설명:
페이지에는 댓글 양식이 하나만 있습니다.
사용자가 댓글의 "Reply" 버튼을 클릭하면 해당 댓글의 ID가 검색되어 양식의 숨겨진 parentId 입력 필드에 설정됩니다. 전체 양식도 답글을 받고 있는 댓글 바로 아래로 이동합니다.
답글 양식에는 "Cancel Reply" 버튼이 표시됩니다. "Cancel Reply"를 클릭하거나 양식을 제출하면 양식이 재설정되고 원래 위치로 돌아갑니다.
실행 및 테스트
애플리케이션을 다시 시작하십시오:
npm run start:dev
브라우저를 열고 다음으로 이동하십시오: http://localhost:3000/
게시물에서 댓글을 찾아 "Reply" 버튼을 클릭하십시오. 댓글 아래에 답글 양식이 나타날 것입니다.
내용을 입력하고 제출하십시오. 페이지가 새로 고침된 후 답글이 부모 댓글 아래에 들여쓰기 된 상태로 표시되는 것을 볼 수 있습니다.
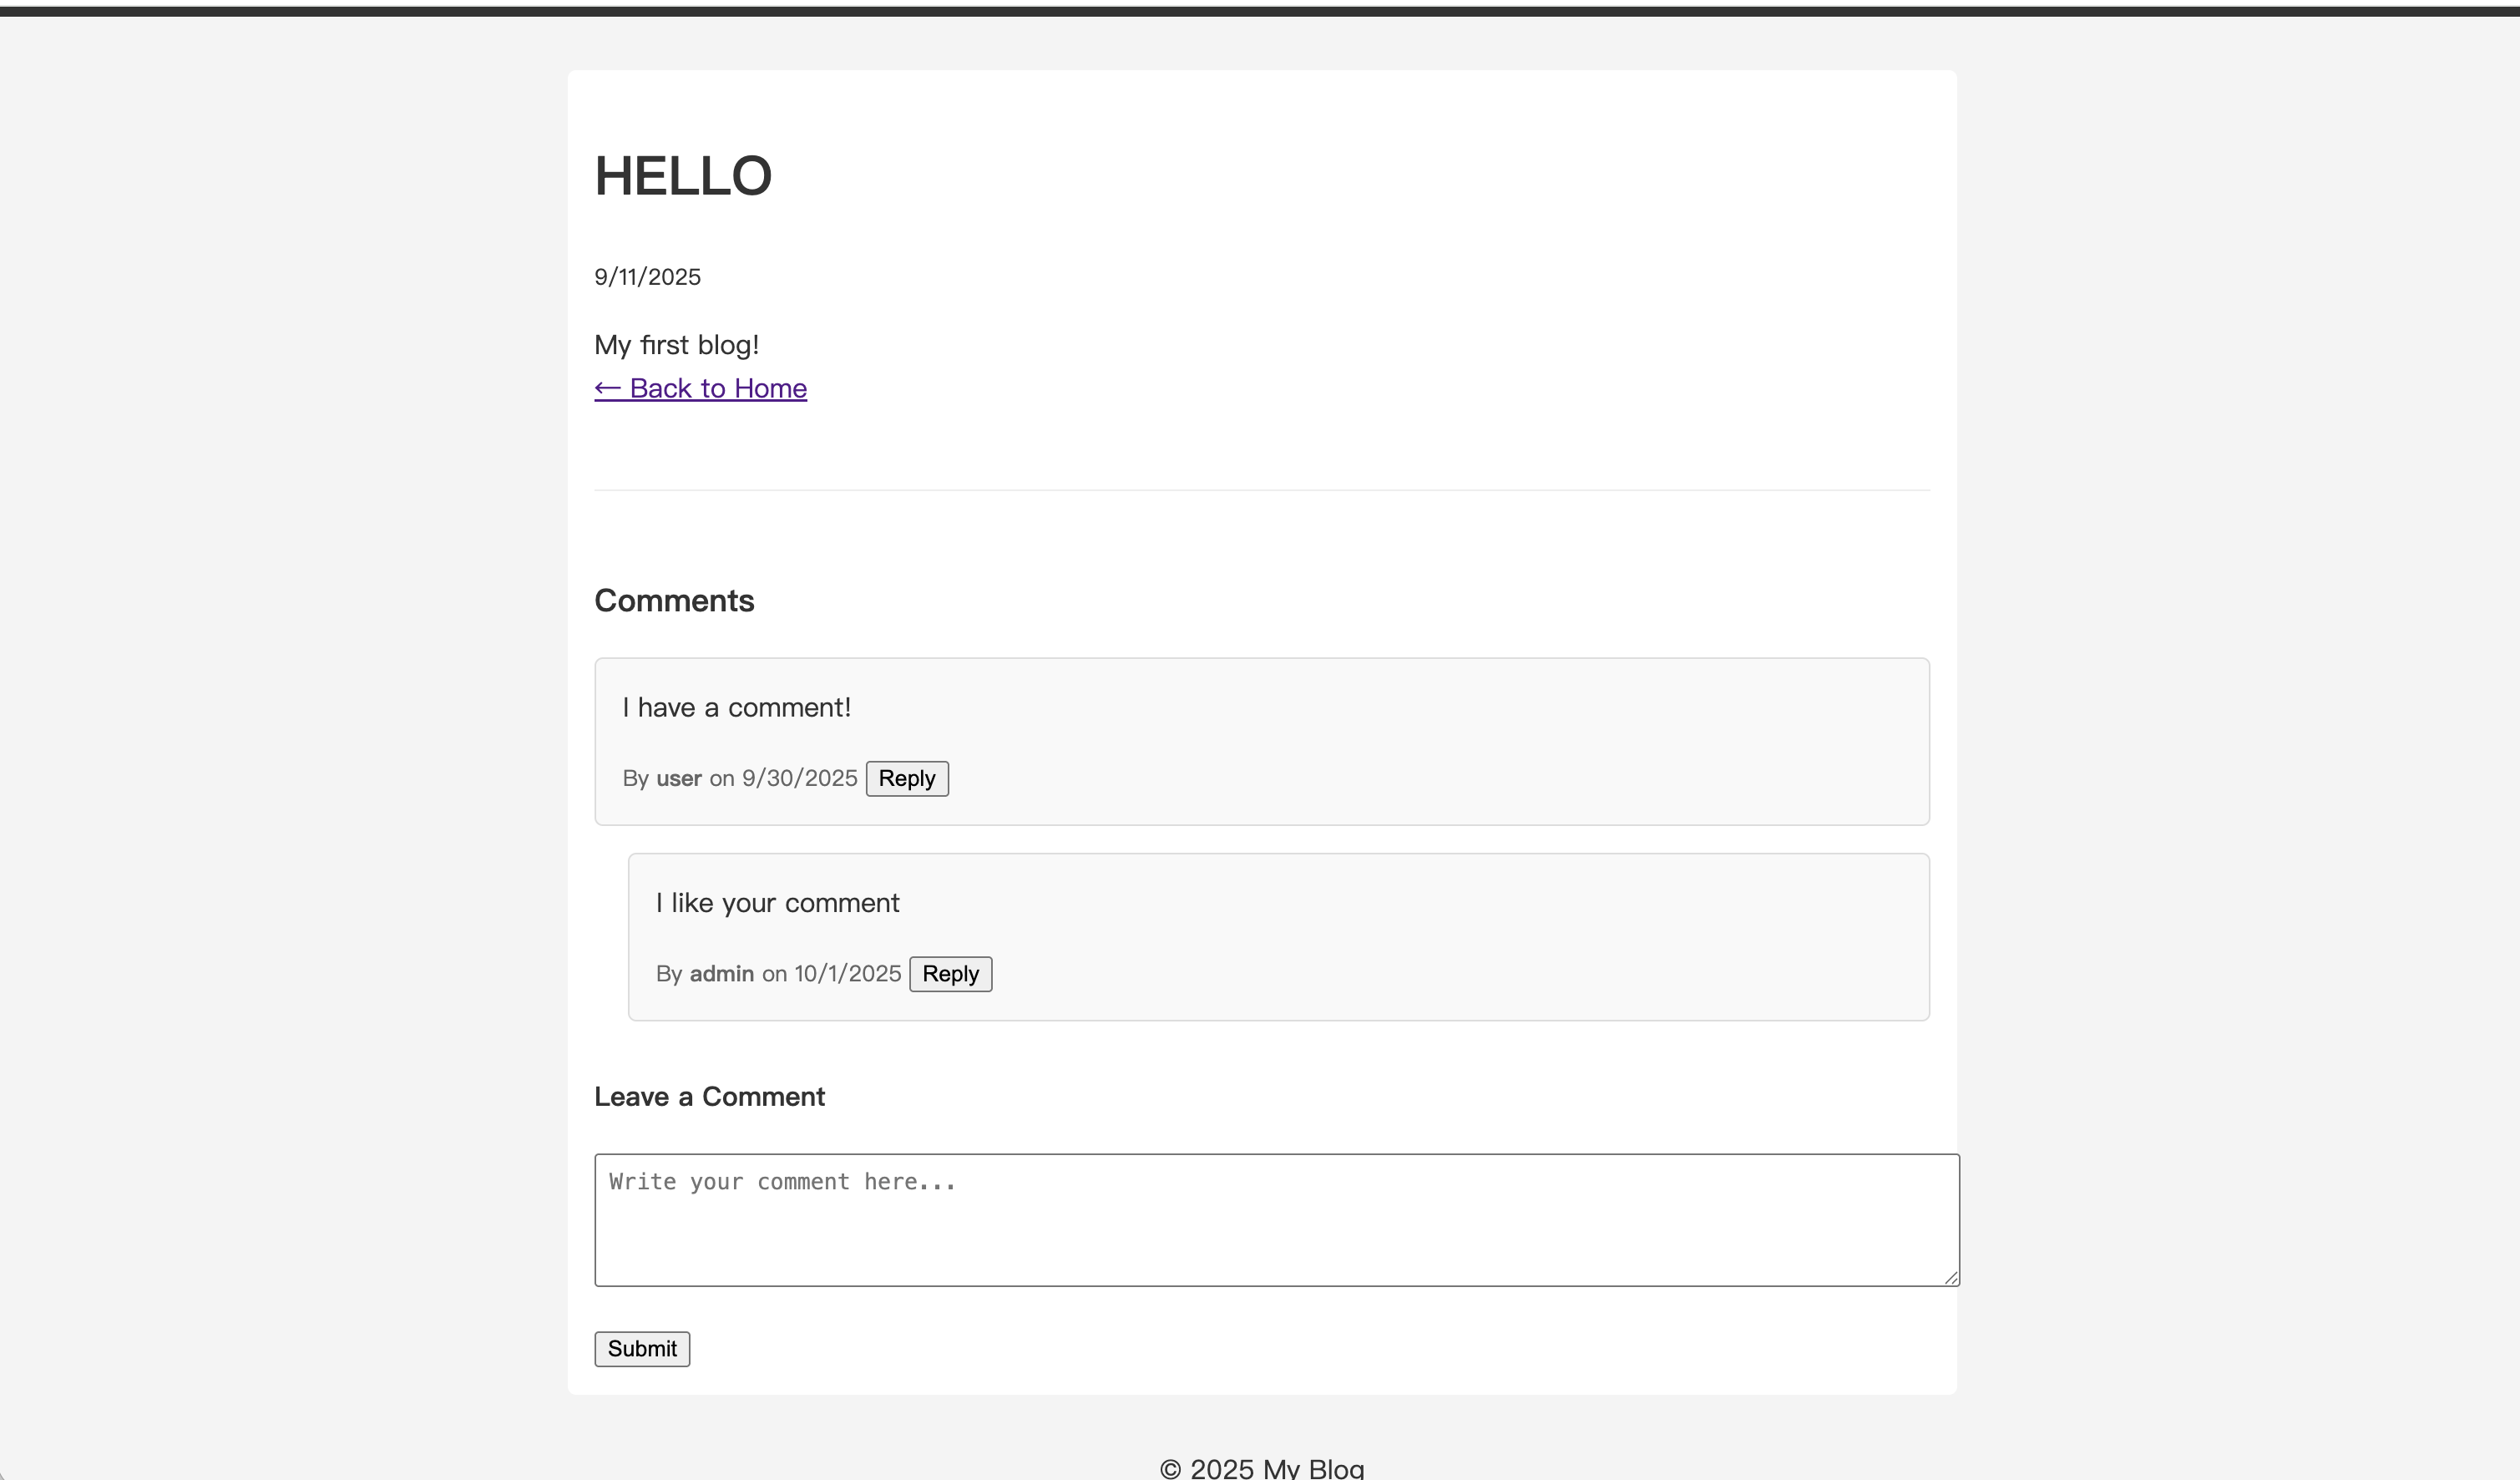
여러 단계의 대화를 만들어 답글에 계속 답글을 달 수 있습니다.
이제 완전한 댓글 답글 시스템이 갖추어졌습니다.
이전 튜토리얼: