10分でコードの初入力からライブデプロイまで:驚速FastAPIブログコース
Wenhao Wang
Dev Intern · Leapcell

10分でコードの初入力からライブデプロイまで:驚速FastAPIブログコース
これはFastAPIの短期集中コースです。このチュートリアルでは、Python FastAPIを使用して、コードの初入力からデプロイまで、わずか数ステップで10分未満でブログを構築します。
このコースが非常に速い理由は、すべての概念を深く掘り下げるのではなく、完成品を構築するまで直接案内するからです。既存の製品を自分のアイデアに基づいて変更することが、新しいフレームワークを習得する最も効率的な方法だと私は信じています。
このブログは、Python Web開発で一般的に使用されるテクノロジースタックを使用した、純粋なバックエンドロジックとレンダリングプロジェクトです:
- FastAPI + Uvicorn
- PostgreSQL
- SQLModel:コードからデータベースと対話するため。
- Jinja2:フロントエンドページをレンダリングするためのテンプレートエンジン。
早速始めましょう:
1. プロジェクトの初期化
ターミナルで次のコマンドを実行します:
# 1. プロジェクトディレクトリを作成して移動
mkdir fastapi-personal-blog && cd fastapi-personal-blog

# 2. 仮想環境を作成してアクティベート
python -m venv venv
source venv/bin/activate
requirements.txtファイルを作成し、次の依存関係を追加します:
# requirements.txt
fastapi
```usvicorn[standard]
sqlmodel
```psycopg2-binary
jinja2
```python-dotenv
```python-multipart
その後、インストールします:
pip install -r requirements.txt
2. PostgreSQLデータベースへの接続
次に、PostgreSQLデータベースを統合します。
データベースの設定
チュートリアルを迅速に進めるため、ローカルにデータベースをインストールして設定する手順はスキップします。代わりに、オンラインデータベースを直接プロビジョニングします。
Leapcellでワンクリックで無料データベースを作成できます。

ウェブサイトでアカウントを登録した後、「データベースを作成」をクリックします。

データベース名を入力し、デプロイメントリージョンを選択すると、PostgreSQLデータベースを作成できます。
表示される新しいページで、データベースに接続するために必要な情報が見つかります。コントロールパネルが下部に用意されており、ウェブページで直接データベースの読み取りと変更が可能です。

新しいページにある接続情報で、接続文字列を見つけます。これはすぐに使用します。
データベース接続の設定
プロジェクトのルートディレクトリに.envファイルを作成し、機密性の高い接続情報を保存します。Leapcellから取得したURLを貼り付けます。
# .env
DATABASE_URL="postgresql://user:password@host:port/dbname"
次に、database.pyファイルを作成してデータベース接続を処理します:
# database.py
import os
from sqlmodel import create_engine, SQLModel, Session
from dotenv import load_dotenv

load_dotenv()

DATABASE_URL = os.getenv("DATABASE_URL")

engine = create_engine(DATABASE_URL)

def create_db_and_tables():
    SQLModel.metadata.create_all(engine)

def get_session():
    with Session(engine) as session:
        yield session
3. Postモジュールの作成
次に、ブログ投稿に関連するロジックを実装します。
プロジェクトのルートディレクトリにmodels.pyファイルを作成して、データモデルを定義します。
# models.py
import uuid
from datetime import datetime
from typing import Optional
from sqlmodel import Field, SQLModel

class Post(SQLModel, table=True):
    id: Optional[uuid.UUID] = Field(default_factory=uuid.uuid4, primary_key=True)
    title: str
    content: str
    createdAt: datetime = Field(default_factory=datetime.utcnow, nullable=False)
SQLModelは、このクラスをデータベースのpostテーブルに自動的にマッピングします。create_db_and_tables関数は、アプリケーション起動時にこのテーブルが作成されることを保証するため、SQLを手動で実行する必要はありません。
4. WebレンダリングのためのJinja2の設定
Jinja2を設定してHTMLウェブサイトをレンダリングします。
ディレクトリ構造の作成
プロジェクトのルートディレクトリにtemplatesとpublicフォルダを作成します。templatesフォルダにはHTMLファイルを格納し、publicフォルダにはCSSやJavaScriptなどの静的アセットを格納します。
最終的なプロジェクト構造は次のようになります:
- fastapi-personal-blog
    - templates
    - public
    - .env
    - database.py
    - models.py
    - requirements.txt
フロントエンドページの実装
templatesフォルダ内に以下のファイルを作成します:
-
_header.html(再利用可能なヘッダー)<!DOCTYPE html> <html lang="en"> <head> <meta charset="UTF-8" /> <meta name="viewport" content="width=device-width, initial-scale=1.0" /> <title>{{ title }}</title> <link rel="stylesheet" href="/static/css/style.css" /> </head> <body> <header> <h1><a href="/">My Blog</a></h1> <a href="/posts/new" class="new-post-btn">New Post</a> </header> <main></main> </body> </html> -
_footer.html(再利用可能なフッター)</main> <footer> <p>© 2025 My Blog</p> </footer> </body> </html> -
index.html(ブログホームページ){% include "_header.html" %} <div class="post-list"> {% for post in posts %} <article class="post-item"> <h2><a href="/posts/{{ post.id }}">{{ post.title }}</a></h2> <p>{{ post.content[:150] }}...</p> <small>{{ post.createdAt.strftime('%Y-%m-%d') }}</small> </article> {% endfor %} </div> {% include "_footer.html" %} -
post.html(投稿詳細ページ){% include "_header.html" %} <article class="post-detail"> <h1>{{ post.title }}</h1> <small>{{ post.createdAt.strftime('%Y-%m-%d') }}</small> <div class="post-content">{{ post.content | replace('\n', '<br />') | safe }}</div> </article> <a href="/" class="back-link">← Back to Home</a> {% include "_footer.html" %} -
new-post.html(新規投稿ページ){% include "_header.html" %} <form action="/posts" method="POST" class="post-form"> <div class="form-group"> <label for="title">Title</label> <input type="text" id="title" name="title" required /> </div> <div class="form-group"> <label for="content">Content</label> <textarea id="content" name="content" rows="10" required></textarea> </div> <button type="submit">Submit</button> </form> {% include "_footer.html" %}
CSSスタイルの追加
publicディレクトリにcssフォルダを作成し、その中にstyle.cssファイルを作成します。スタイルは元の記事と一致しています。
/* public/css/style.css */
body {
  font-family: sans-serif;
  line-height: 1.6;
  margin: 0;
  background-color: #f4f4f4;
  color: #333;
}
header {
  background: #333;
  color: #fff;
  padding: 1rem;
  display: flex;
  justify-content: space-between;
  align-items: center;
}
header a {
  color: #fff;
  text-decoration: none;
}
main {
  max-width: 800px;
  margin: 2rem auto;
  padding: 1rem;
  background: #fff;
  border-radius: 5px;
}
.post-item {
  margin-bottom: 2rem;
  border-bottom: 1px solid #eee;
  padding-bottom: 1rem;
}
.post-item h2 a {
  text-decoration: none;
  color: #333;
}
.post-detail .post-content {
  margin-top: 1rem;
}
.new-post-btn {
  background: #5cb85c;
  padding: 0.5rem 1rem;
  border-radius: 5px;
}
.post-form .form-group {
  margin-bottom: 1rem;
}
.post-form label {
  display: block;
  margin-bottom: 0.5rem;
}
.post-form input,
.post-form textarea {
  width: 100%;
  padding: 0.5rem;
}
.post-form button {
  background: #337ab7;
  color: #fff;
  padding: 0.7rem 1.5rem;
  border: none;
  cursor: pointer;
}
footer p {
  text-align: center;
}
5. メインアプリケーションロジックの記述
最後に、プロジェクトのルートディレクトリにmain.pyファイルを作成します。このファイルはアプリケーション全体の入力ポイントであり、データベース、ルーティング、テンプレートロジックを統合します。
# main.py
import uuid
from contextlib import asynccontextmanager
from fastapi import FastAPI, Request, Depends, Form
from fastapi.responses import HTMLResponse, RedirectResponse
from fastapi.staticfiles import StaticFiles
from fastapi.templating import Jinja2Templates
from sqlmodel import Session, select

from database import create_db_and_tables, get_session
from models import Post

# アプリケーション起動時にデータベーステーブルを作成
@asynccontextmanager
async def lifespan(app: FastAPI):
    print("Creating tables..")
    create_db_and_tables()
    yield

app = FastAPI(lifespan=lifespan)

# 静的ファイルディレクトリをマウント
app.mount("/static", StaticFiles(directory="public"), name="static")

# Jinja2テンプレートディレクトリを設定
templates = Jinja2Templates(directory="templates")

@app.get("/", response_class=HTMLResponse)
def root():
    # ルートパスを投稿リストにリダイレクト
    return RedirectResponse(url="/posts", status_code=302)

@app.get("/posts", response_class=HTMLResponse)
def get_all_posts(request: Request, session: Session = Depends(get_session)):
    # すべての投稿を、作成日時降順でクエリ
    statement = select(Post).order_by(Post.createdAt.desc())
    posts = session.exec(statement).all()
    return templates.TemplateResponse("index.html", {"request": request, "posts": posts})

@app.get("/posts/new", response_class=HTMLResponse)
def new_post_form(request: Request):
    # 新規投稿作成のためのフォームページを表示
    return templates.TemplateResponse("new-post.html", {"request": request, "title": "New Post"})

@app.post("/posts", response_class=HTMLResponse)
def create_post(
    title: str = Form(...),
    content: str = Form(...),
    session: Session = Depends(get_session)
):
    # フォームからデータを受け取り、新規投稿を作成
    new_post = Post(title=title, content=content)
    session.add(new_post)
    session.commit()
    return RedirectResponse(url="/posts", status_code=302)

@app.get("/posts/{post_id}", response_class=HTMLResponse)
def get_post_by_id(request: Request, post_id: uuid.UUID, session: Session = Depends(get_session)):
    # IDで単一の投稿をクエリして表示
    post = session.get(Post, post_id)
    return templates.TemplateResponse("post.html", {"request": request, "post": post, "title": post.title})
6. ブログの実行
これでブログ開発は完了です。ターミナルで次のコマンドを実行してブログを開始します:
uvicorn main:app --reload
--reloadパラメータは、コードを変更したときにサーバーを自動的に再起動するため、開発やデバッグに便利です。
ブラウザでhttp://localhost:8000を開いて、ブログのホームページを確認してください。新しい投稿を作成して、すべての機能をテストできます!


7. ブログのオンラインデプロイ
これで、作成したウェブサイトを他の人に見てもらい、誰でもアクセスできるようにするにはどうすればよいか、疑問に思っているかもしれません。
以前データベース作成に使用したLeapcellを覚えていますか? Leapcellはデータベースを作成するだけでなく、FastAPIを含むさまざまな言語やフレームワークのプロジェクトをホストできるWebアプリホスティングプラットフォームでもあります。
以下の手順に従ってください:
- プロジェクトをGitHubにコミットします。GitHubの公式ドキュメントを参照して手順を確認してください。Leapcellは後でGitHubリポジトリからコードを取得します。
- Leapcellページで「サービスを作成」をクリックします。

- FastAPIリポジトリを選択すると、Leapcellが必要な構成を自動入力します。
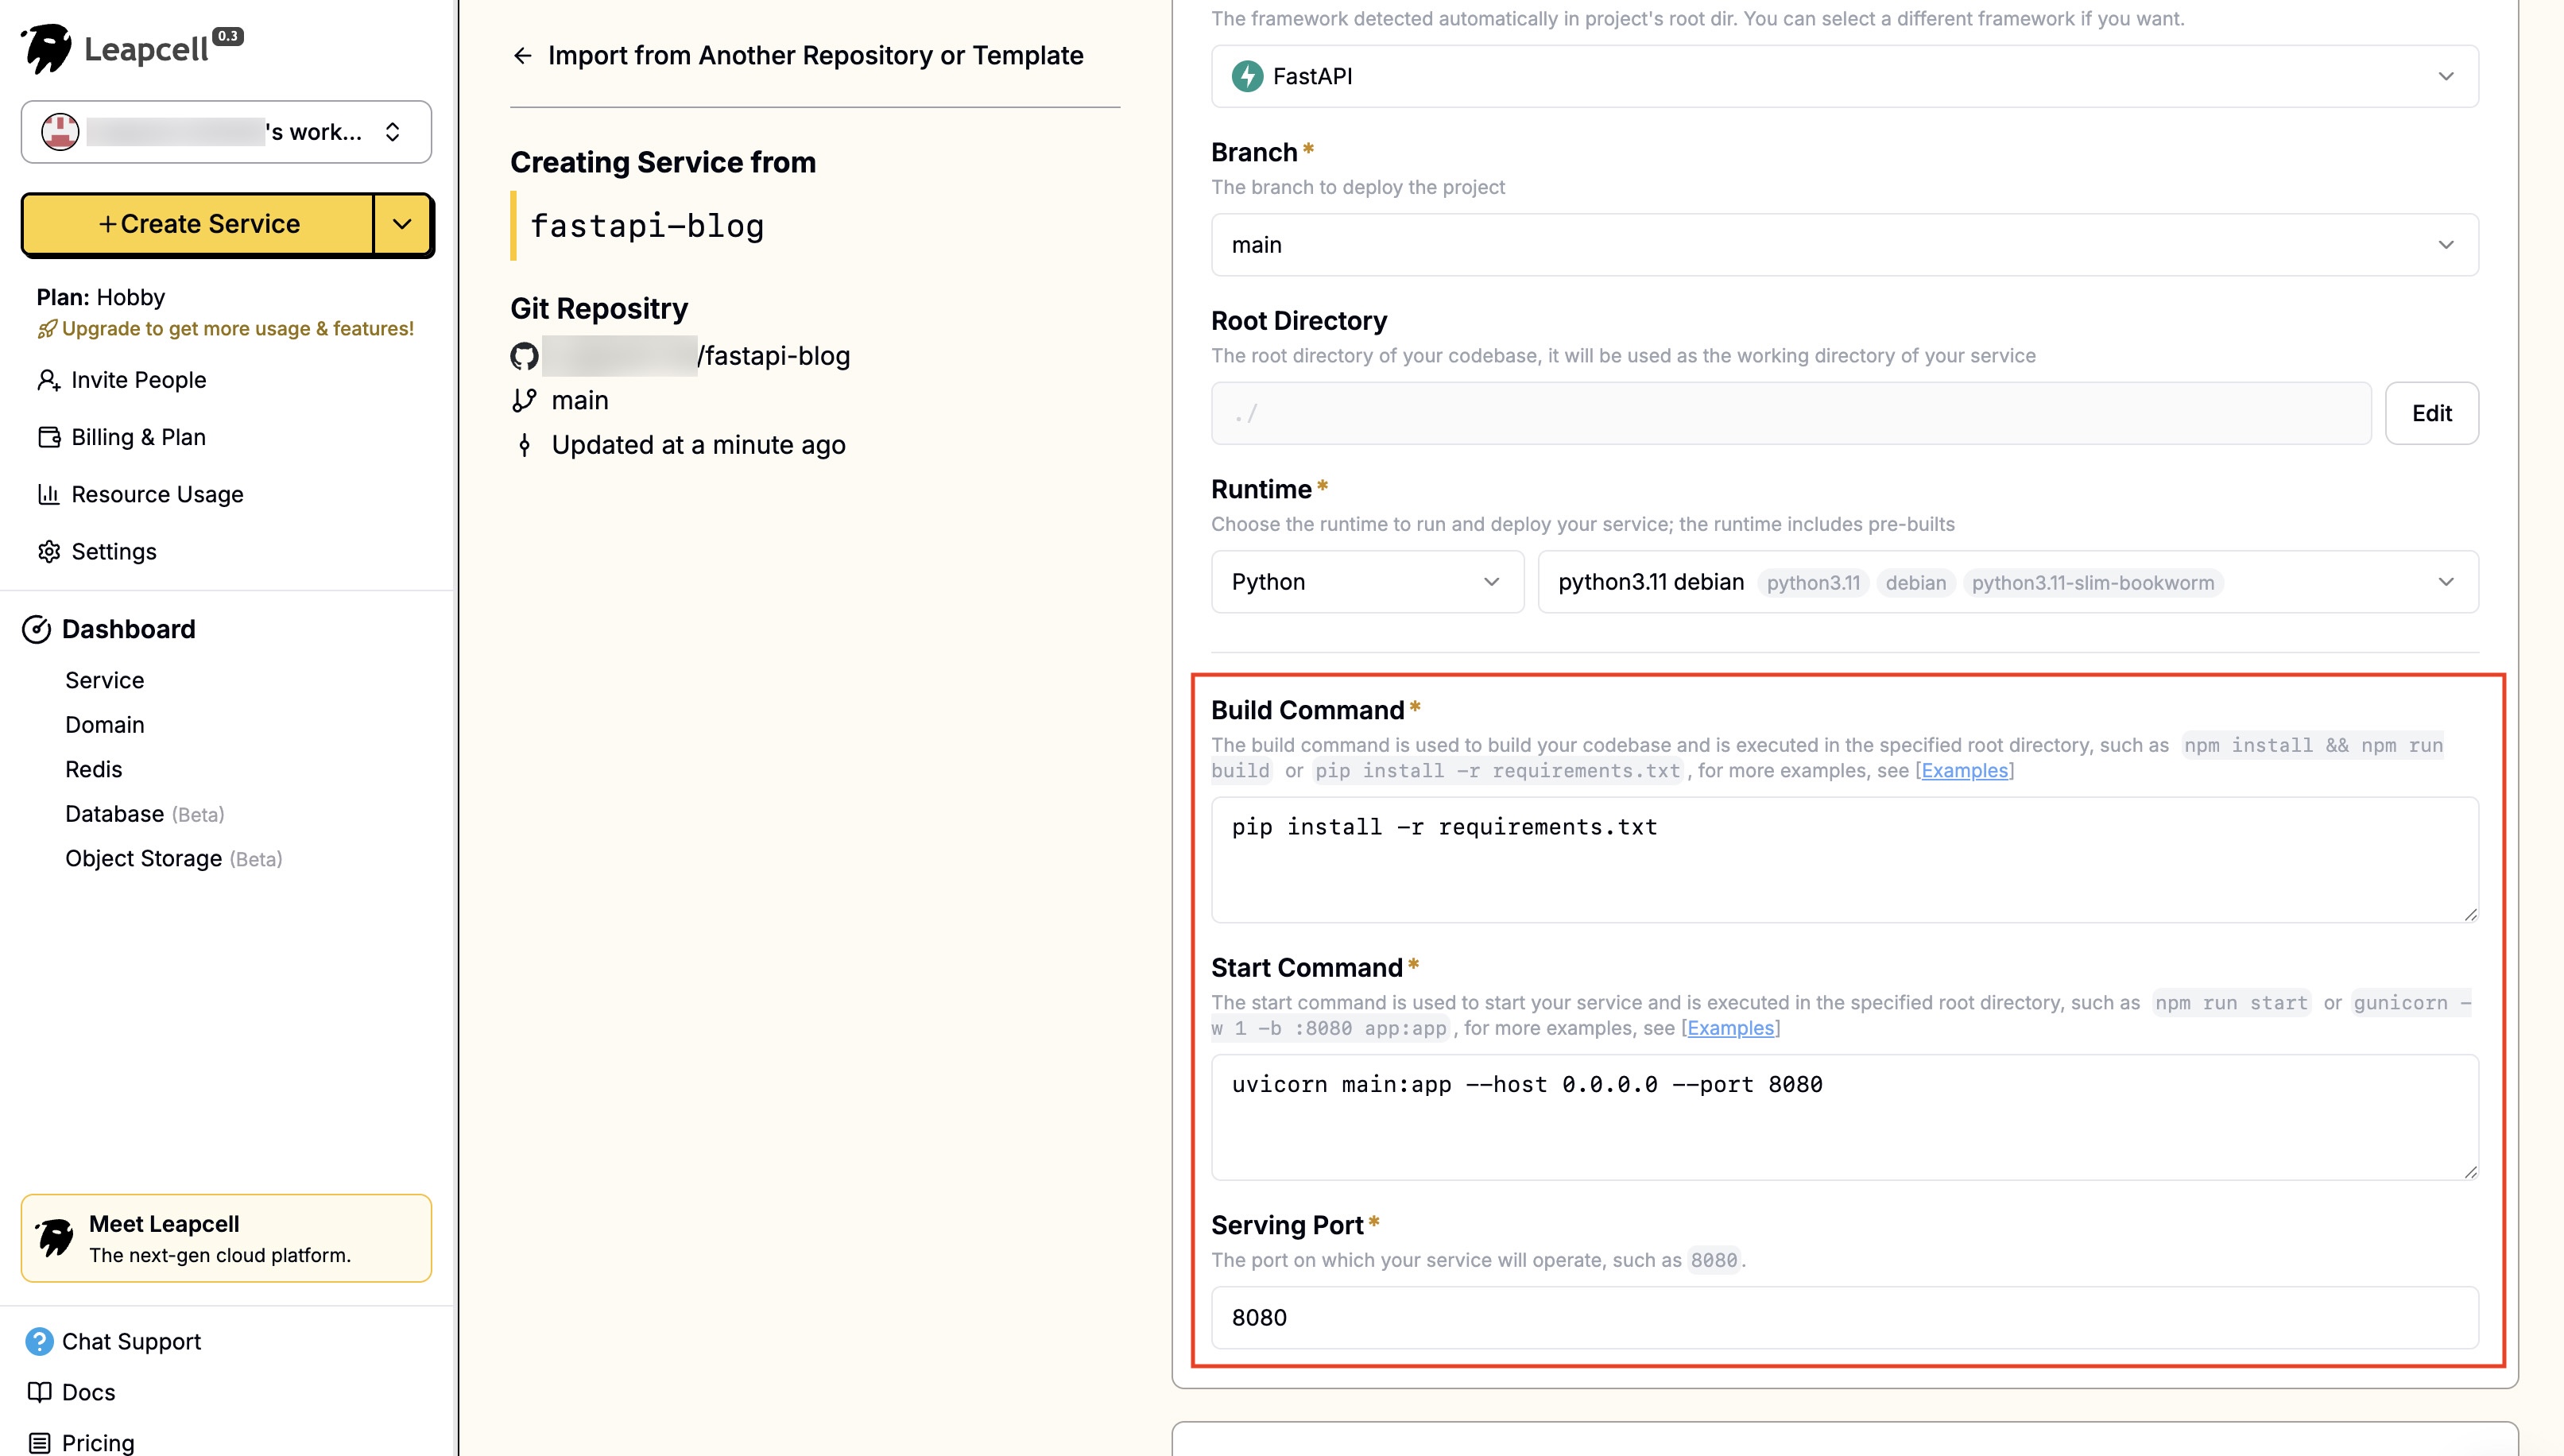
- 環境変数はご自身で入力する必要があります。
DATABASE_URLを.envファイルと同じ値に設定します。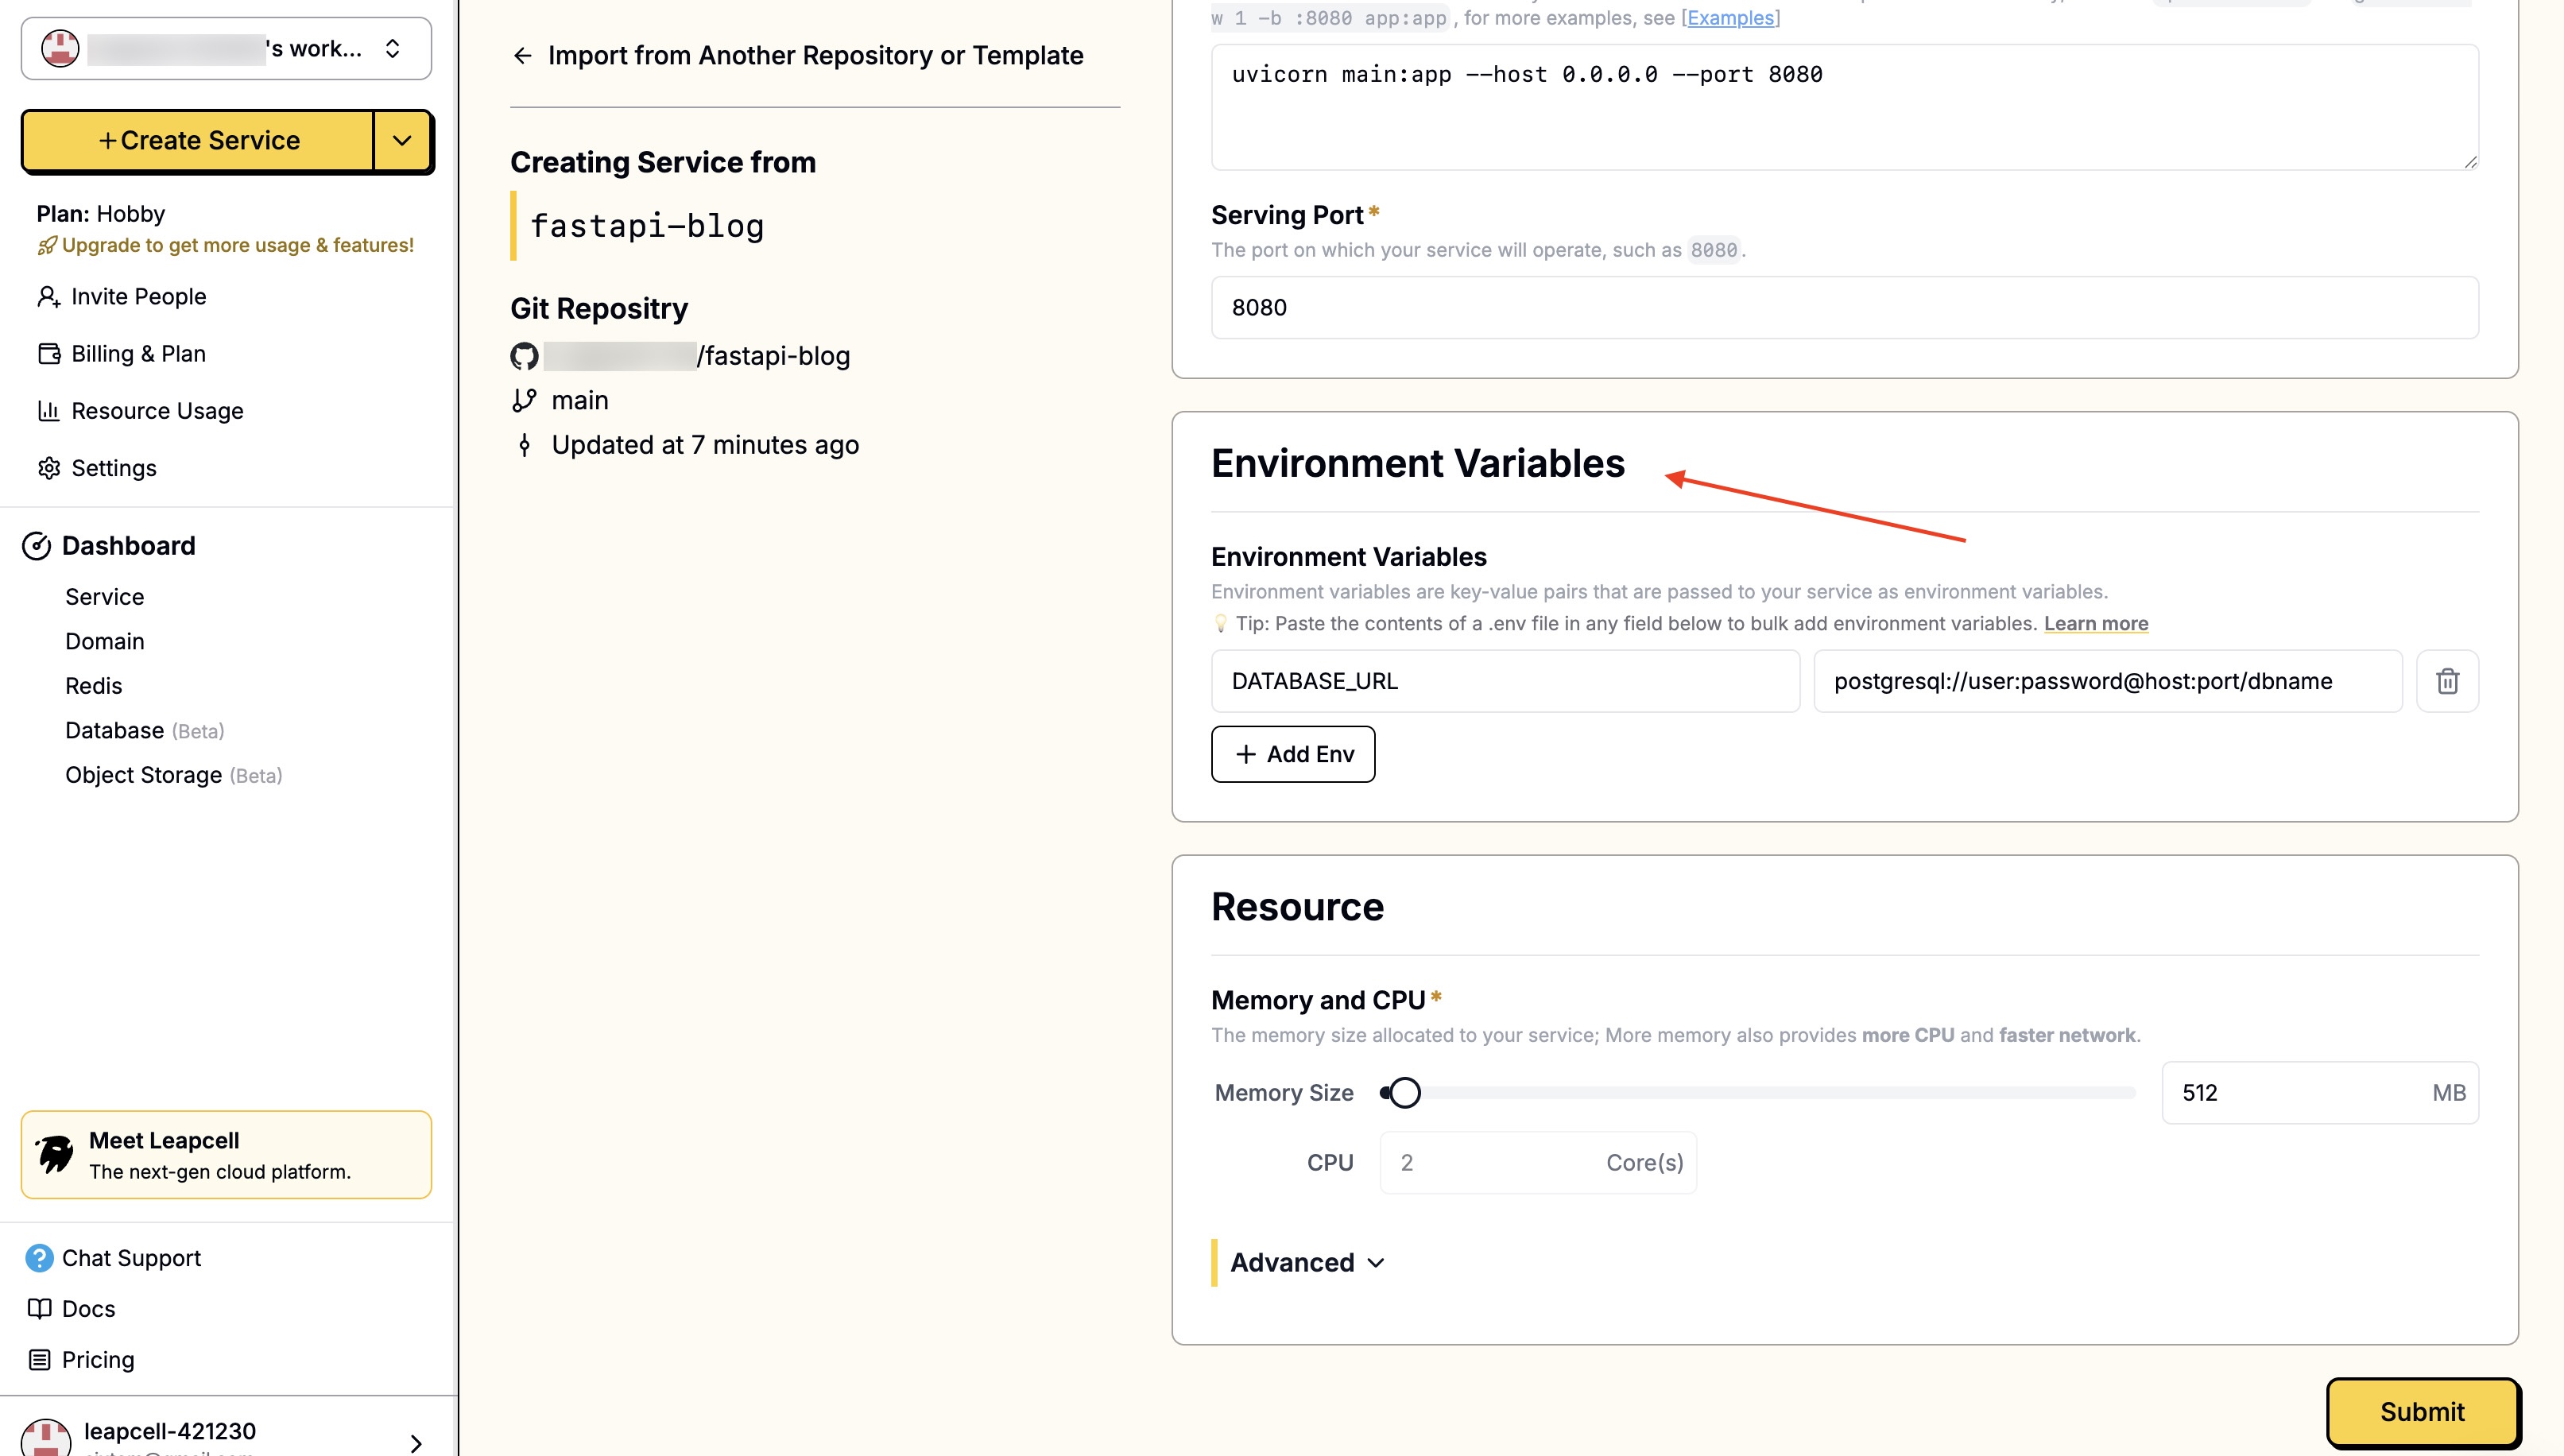
- 下部にある「Submit」をクリックしてデプロイします。デプロイはすぐに完了し、デプロイメントホームページに戻ります。ここで、Leapcellがドメインを提供していることがわかります。これがブログのオンラインアドレスです。
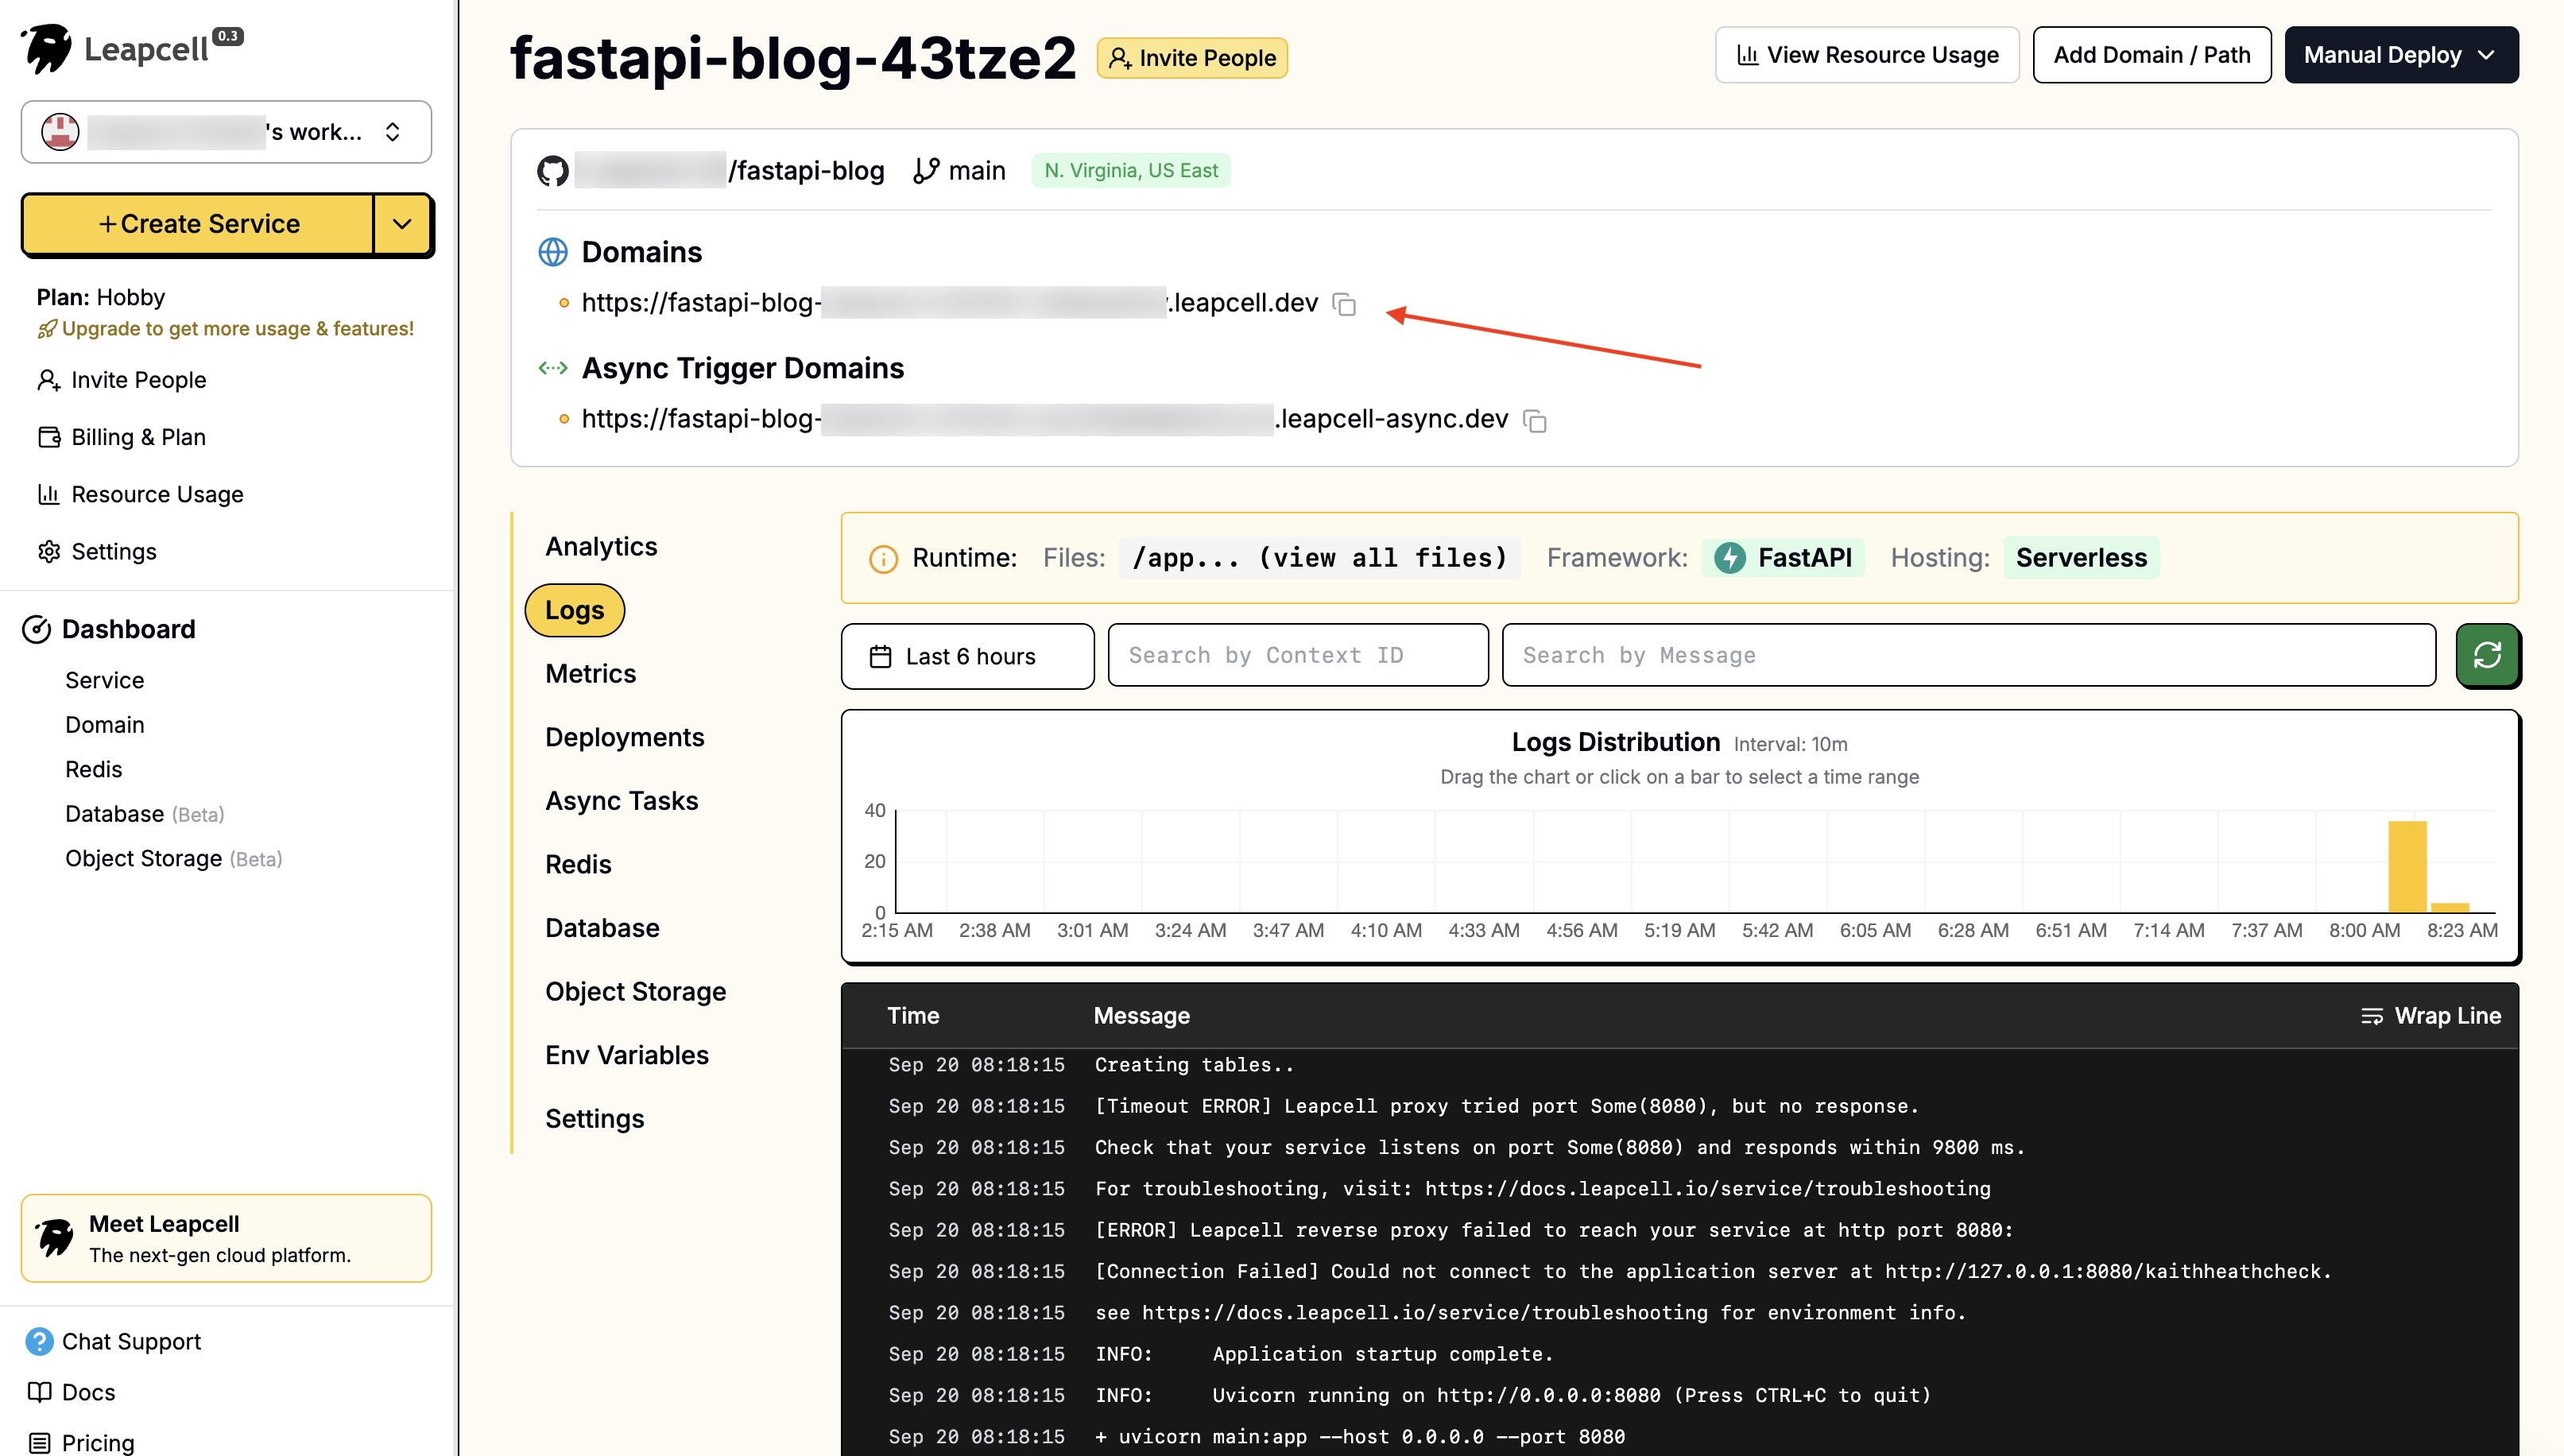
これで、このリンクを友達と共有すれば、誰もがあなたのブログをオンラインで見ることができます!