優れたNest.jsブログを構築する:コメントの返信
Wenhao Wang
Dev Intern · Leapcell
前の記事で、ブログにコメント機能を追加し、読者が投稿に関する意見を共有できるようにしました。
しかし、これらのコメントは一方向です。他の人があなたの投稿にコメントすることはできますが、あなたは相手のコメントに返信することはできません。
コメントセクションをよりインタラクティブにするために、この記事ではコメント返信機能を実装します。ユーザーは既存のコメントに返信できるようになり、これらの返信はネストされた(またはインデントされた)形式で表示され、返信の階層を示します。
ステップ1:データモデルの更新
返信機能を実装するには、コメント間に親子関係を確立する必要があります。返信は本質的にコメント自体ですが、「親コメント」を持っています。これは、Commentエンティティに自己参照関係を追加することによって実現します。
データベーステーブルの変更
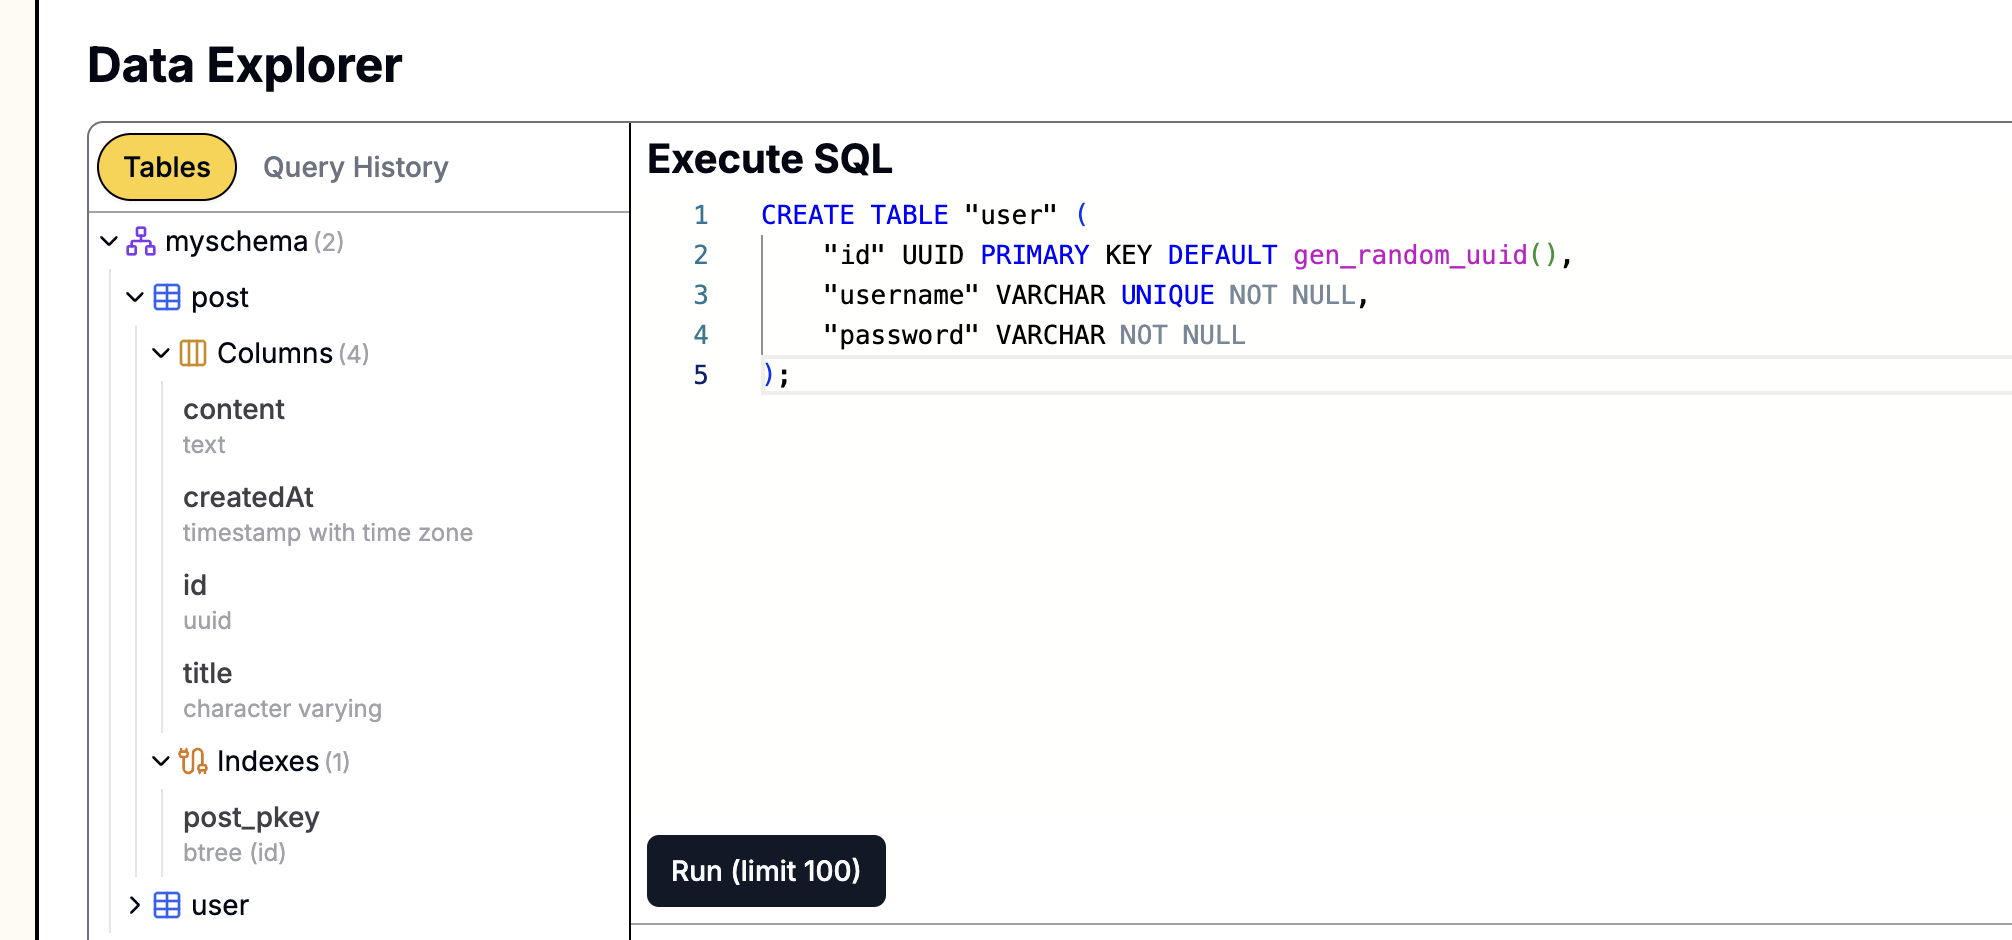
まず、commentテーブルの構造を変更して、親コメントのIDを指すparentIdフィールドを追加します。
PostgreSQLデータベースで次のALTER TABLEステートメントを実行します。
ALTER TABLE "comment"
ADD COLUMN "parentId" UUID REFERENCES "comment"("id") ON DELETE CASCADE;
parentId列は、トップレベルのコメントに親がないため、オプション(NULLを許可)です。REFERENCES "comment"("id")は、parentIdを同じテーブルのid列にリンクする外部キーを作成します。
Leapcellでデータベースが作成されている場合、

グラフィカルインターフェイスを使用してSQLステートメントを簡単に実行できます。ウェブサイトのデータベース管理ページにアクセスし、上記のステートメントをSQLインターフェイスに貼り付けて実行するだけです。
コメントエンティティの更新
src/comments/comment.entity.tsファイルを開き、この階層関係をコードに反映するためにparentおよびrepliesプロパティを追加します。
// src/comments/comment.entity.ts
import { Entity, Column, PrimaryColumn, CreateDateColumn, ManyToOne, OneToMany } from 'typeorm';
import { User } from '../users/user.entity';
import { Post } from '../posts/post.entity';

@Entity()
export class Comment {
  @PrimaryColumn({ type: 'uuid', default: () => 'gen_random_uuid()' })
  id: string;

  @Column('text')
  content: string;

  @CreateDateColumn()
  createdAt: Date;

  @ManyToOne(() => User, (user) => user.comments)
  user: User;

  @ManyToOne(() => Post, (post) => post.comments)
  post: Post;

  // --- New Fields ---

  @ManyToOne(() => Comment, (comment) => comment.replies, { nullable: true })
  parent: Comment; // Parent comment

  @OneToMany(() => Comment, (comment) => comment.parent)
  replies: Comment[]; // List of child comments (replies)
}
ステップ2:コメントサービスの調整
サービスレイヤーは、新しいコメントを作成する際に親コメントを関連付け、クエリ時にコメントのフラットなリストをツリー構造に構造化するように調整する必要があります。
src/comments/comments.service.tsを開き、次の変更を行います。
// src/comments/comments.service.ts
import { Injectable } from '@nestjs/common';
import { InjectRepository } from '@nestjs/typeorm';
import { Repository } from 'typeorm';
import { Comment } from './comment.entity';
import { Post } from '../posts/post.entity';
import { User } from '../users/user.entity';

@Injectable()
export class CommentsService {
  constructor(
    @InjectRepository(Comment)
    private commentsRepository: Repository<Comment>
  ) {}

  // findByPostId メソッドを変更
  async findByPostId(postId: string): Promise<Comment[]> {
    const comments = await this.commentsRepository.find({
      where: { post: { id: postId } },
      relations: ['user', 'parent'], // Load user and parent simultaneously
      order: {
        createdAt: 'ASC',
      },
    });
    return this.structureComments(comments);
  }

  // フラットなリストをツリー構造に変換する新しいプライベートメソッドを追加
  private structureComments(comments: Comment[]): Comment[] {
    const commentMap = new Map<string, Comment>();
    comments.forEach((comment) => {
      comment.replies = []; // Initialize the replies array
      commentMap.set(comment.id, comment);
    });

    const rootComments: Comment[] = [];
    comments.forEach((comment) => {
      if (comment.parent) {
        const parentComment = commentMap.get(comment.parent.id);
        if (parentComment) {
          parentComment.replies.push(comment);
        }
      } else {
        rootComments.push(comment);
      }
    });

    return rootComments;
  }

  // オプションのparentIdを受け入れるようにcreateメソッドを変更
  async create(content: string, user: User, post: Post, parentId?: string): Promise<Comment> {
    const newComment = this.commentsRepository.create({
      content,
      user,
      post,
      parent: parentId ? ({ id: parentId } as Comment) : undefined,
    });
    return (await this.commentsRepository.save([newComment]))[0];
  }
}
ロジックの説明:
findByPostIdは、投稿のすべてのコメント(トップレベルのコメントとすべての返信を含む)を取得するようになりました。- 新しい
structureCommentsメソッドは、ロジックの中核です。すべてのコメントを反復処理します。コメントにparentがある場合、その親コメントのreplies配列に配置されます。そうでない場合は、トップレベルのコメントです。 createメソッドにオプションのparentIdパラメータが追加されました。このIDが提供されると、新しく作成されたコメントは対応する親コメントに関連付けられます。
ステップ3:コントローラーの更新
コントローラーは、リクエストボディからオプションのparentIdを受け取り、それをサービスに渡す必要があります。この変更は非常に簡単です。
src/comments/comments.controller.tsを開きます。
// src/comments/comments.controller.ts
import { Controller, Post, Body, Param, Req, Res, UseGuards } from '@nestjs/common';
// ... imports

@Controller('posts/:postId/comments')
export class CommentsController {
  constructor(private readonly commentsService: CommentsService) {}

  @UseGuards(AuthenticatedGuard)
  @Post()
  async create(
    @Param('postId') postId: string,
    @Body('content') content: string,
    @Body('parentId') parentId: string, // <-- Receive parentId
    @Req() req: Request,
    @Res() res: Response
  ) {
    const { user } = req.session as any;

    // Pass parentId to the service
    await this.commentsService.create(content, user, { id: postId } as any, parentId);

    res.redirect(`/posts/${postId}`);
  }
}
ステップ4:フロントエンドビューのアップグレード
ここが最も変更が多い部分です。コメントとその返信を再帰的にレンダリングするようにpost.ejsテンプレートを更新する必要があります。また、返信フォームを動的に表示するJavaScriptも追加する必要があります。
コメントテンプレートの作成
コメントの再帰的なレンダリングを実現するには、コメント用の再利用可能な「部分テンプレート」を作成するのが最善の方法です。
viewsディレクトリに新しいファイル_comment.ejsを作成します。
<% comments.forEach(comment => { %>
<div class="comment-item" style="margin-left: <%= depth * 20 %>px;">
  <p class="comment-content"><%= comment.content %></p>
  <small>
    By <strong><%= comment.user.username %></strong> on <%= new Date(comment.createdAt).toLocaleDateString() %>
  </small>
  <% if (user) { %>
  <button class="reply-btn" data-comment-id="<%= comment.id %>">Reply</button>
  <% } %>
</div>

<% if (comment.replies && comment.replies.length > 0) { %>
  <%- include('_comment', { comments: comment.replies, user: user, post: post, depth: depth + 1 }) %>
<% } %>
<% })
このテンプレートは、渡されたcomments配列を反復処理し、depthを増やしてスタイル上のインデントを実現しながら、各コメントのreplies配列に対して再帰的に自身を呼び出します。
post.ejsの更新
次に、views/post.ejsを更新してこの新しい_comment.ejs部分テンプレートを使用し、ユニバーサルな返信フォームを追加します。
<section class="comments-section">
  <h3>Comments</h3>

  <div class="comment-list">
    <% if (comments.length > 0) { %>
      <%- include('_comment', { comments: comments, user: user, post: post, depth: 0 }) %>
    <% } else { %>
    <p>No comments yet. Be the first to comment!</p>
    <% } %>
  </div>

  <% if (user) { %>
  <form id="comment-form" action="/posts/<%= post.id %>/comments" method="POST" class="comment-form">
    <h4>Leave a Comment</h4>
    <div class="form-group">
      <textarea name="content" rows="4" placeholder="Write your comment here..." required></textarea>
      <input type="hidden" name="parentId" id="parentIdInput" value="" />
    </div>
    <button type="submit">Submit</button>
    <button type="button" id="cancel-reply-btn" style="display: none;">Cancel Reply</button>
  </form>
  <% } else { %>
  <p><a href="/auth/login">Login</a> to leave a comment.</p>
  <% } %>
</section>

<script>
  document.addEventListener('DOMContentLoaded', () => {
    const commentForm = document.getElementById('comment-form');
    const parentIdInput = document.getElementById('parentIdInput');
    const formTitle = commentForm.querySelector('h4');
    const cancelReplyBtn = document.getElementById('cancel-reply-btn');
    const commentList = document.querySelector('.comment-list');

    commentList.addEventListener('click', (e) => {
      if (e.target.classList.contains('reply-btn')) {
        const commentId = e.target.getAttribute('data-comment-id');
        const commentItem = e.target.closest('.comment-item');

        // Move the form to below the comment being replied to
        commentItem.after(commentForm);

        // Set the parentId and the form title
        parentIdInput.value = commentId;
        formTitle.innerText = 'Replying to ' + commentItem.querySelector('strong').innerText;
        cancelReplyBtn.style.display = 'inline-block';
      }
    });

    cancelReplyBtn.addEventListener('click', () => {
      // Reset the form state
      parentIdInput.value = '';
      formTitle.innerText = 'Leave a Comment';
      cancelReplyBtn.style.display = 'none';

      // Move the form back to the bottom of the comments section
      document.querySelector('.comments-section').appendChild(commentForm);
    });
  });
</script>

<%- include('_footer') %>
ロジックの説明:
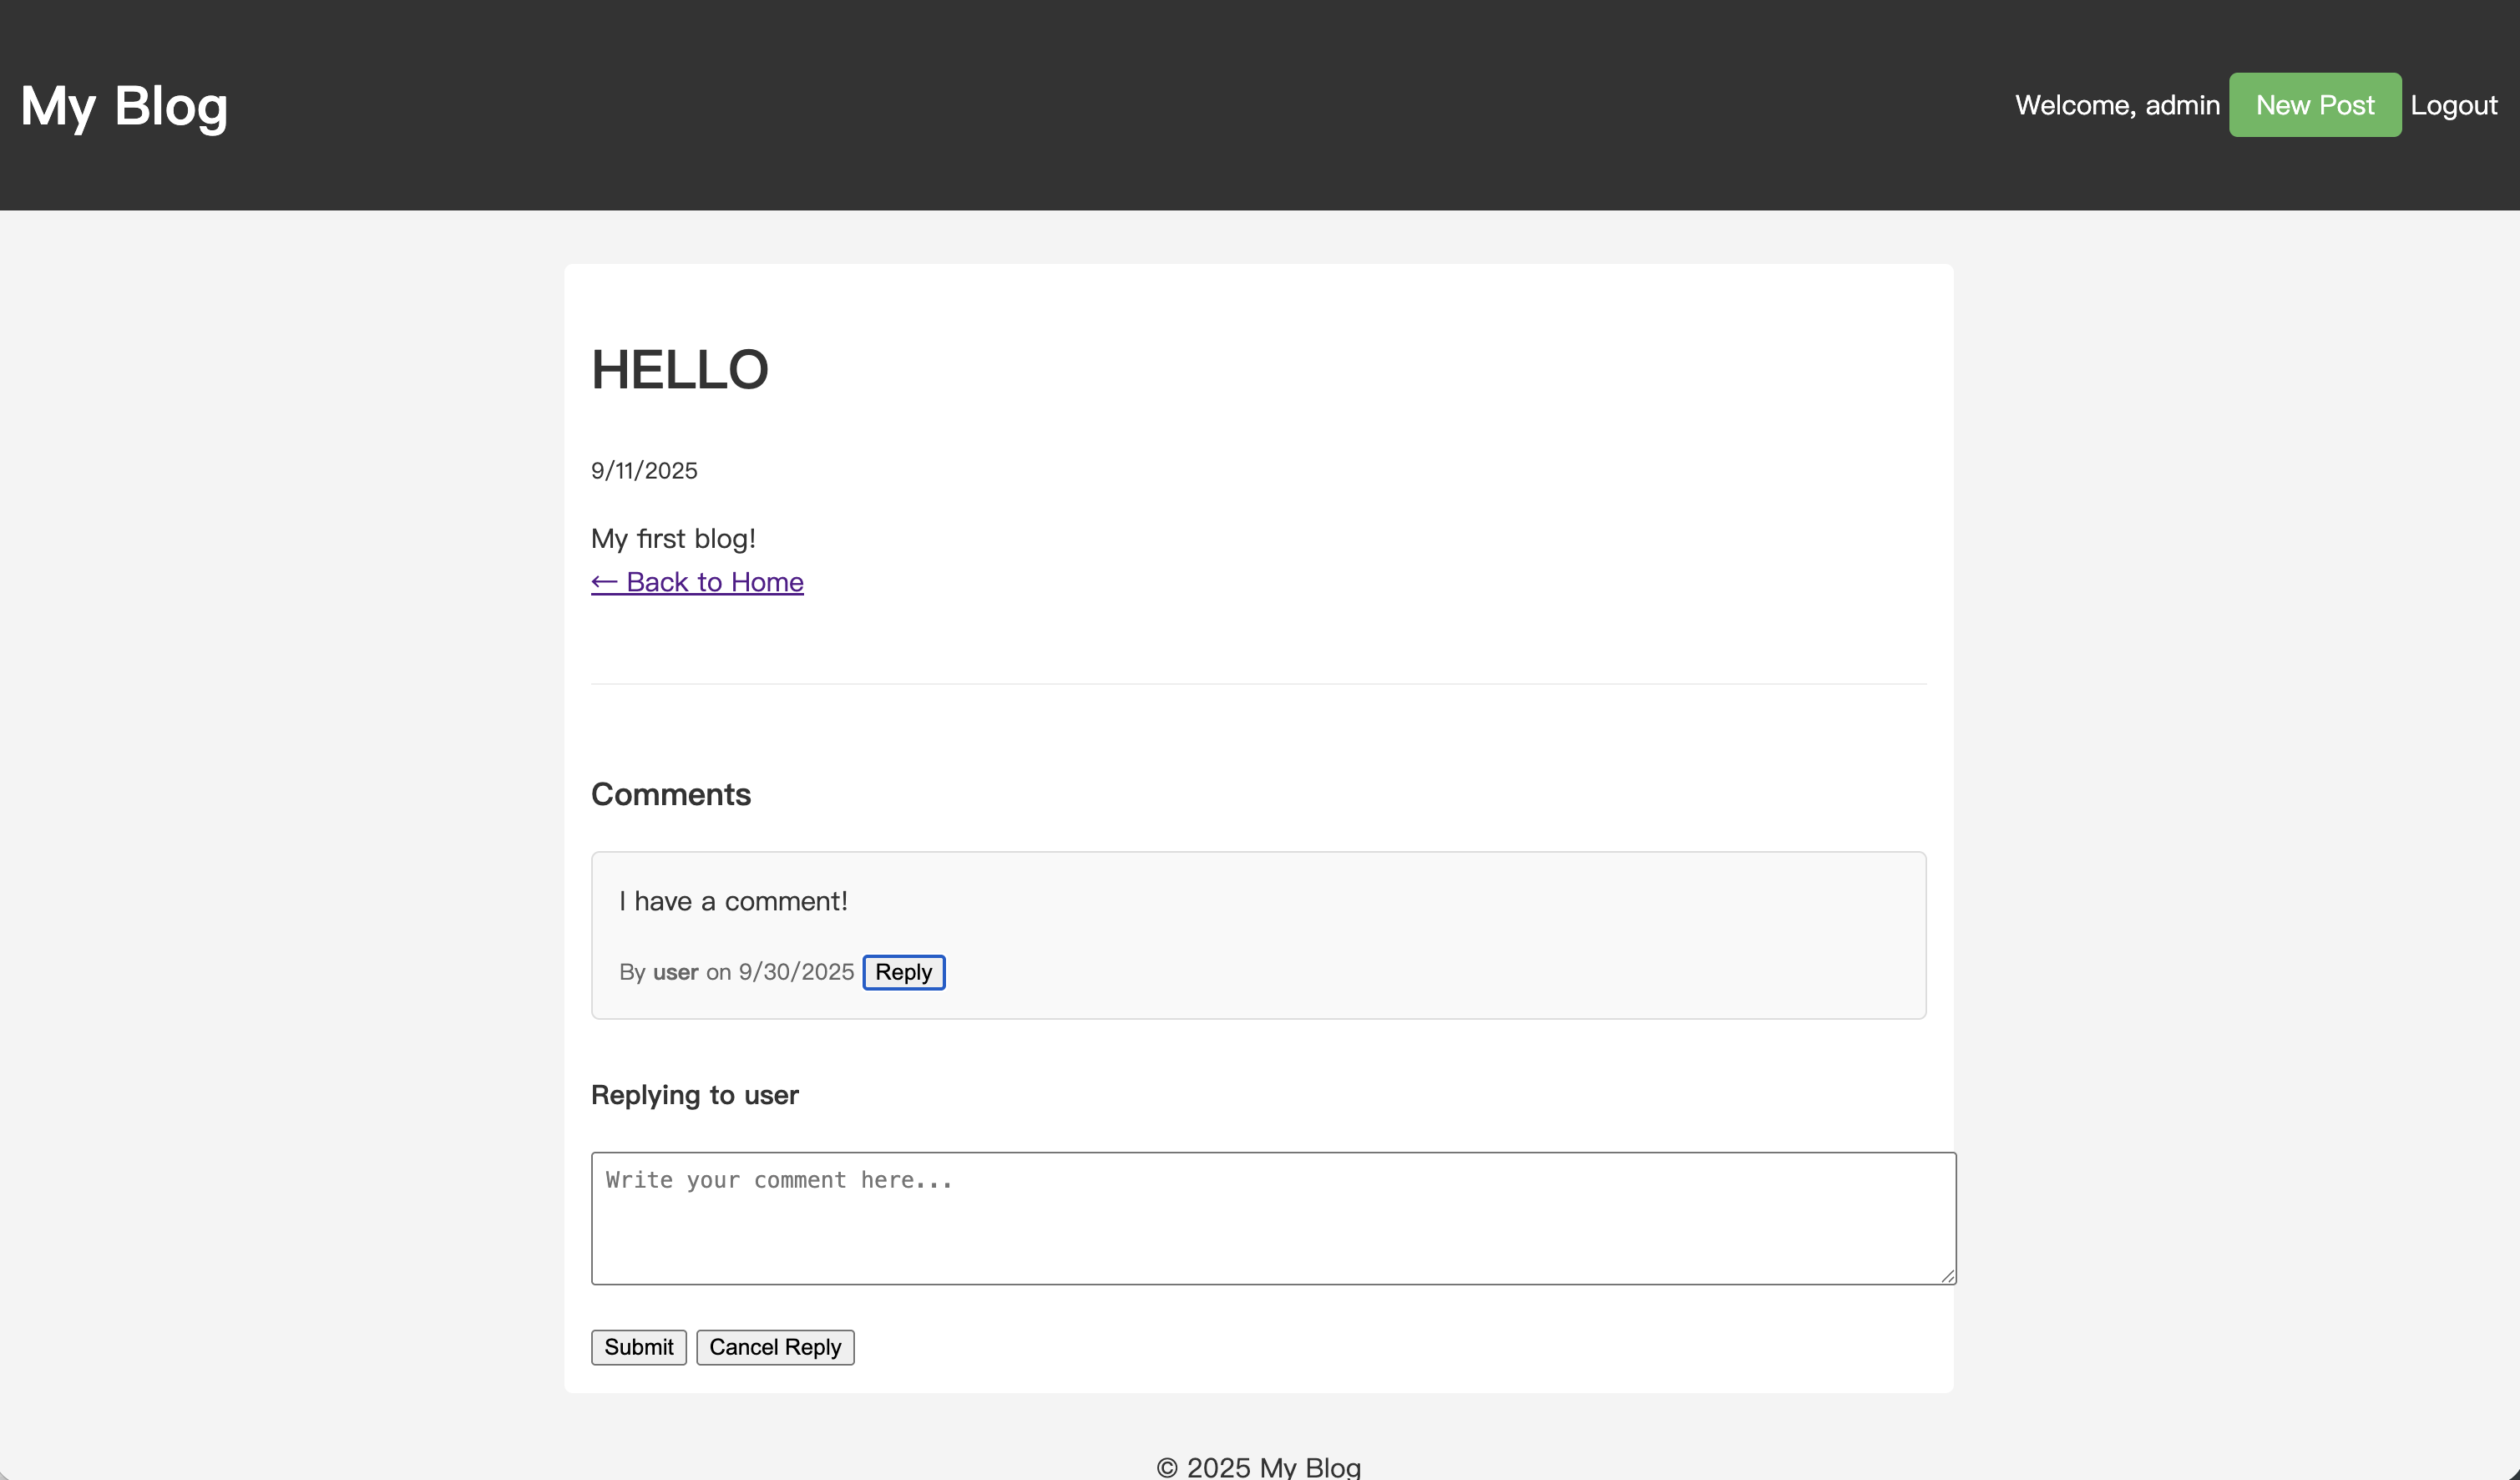
ページには1つのコメントフォームしかありません。
ユーザーがコメントの「返信」ボタンをクリックすると、そのコメントのIDが取得され、フォームの非表示のparentId入力フィールドに設定されます。フォーム全体も、返信されているコメントの直下に移動されます。
返信フォームには「返信をキャンセル」ボタンが表示されます。「返信をキャンセル」をクリックするか、フォームを送信すると、フォームはリセットされ、元の位置に戻されます。
実行とテスト
アプリケーションを再起動します。
npm run start:dev
ブラウザを開き、http://localhost:3000/に移動します。
投稿でコメントを見つけて、「返信」ボタンをクリックします。コメントの直下に返信フォームが表示されます。
コンテンツを入力して送信します。ページがリフレッシュされると、返信が親コメントの下にインデントされて表示されます。
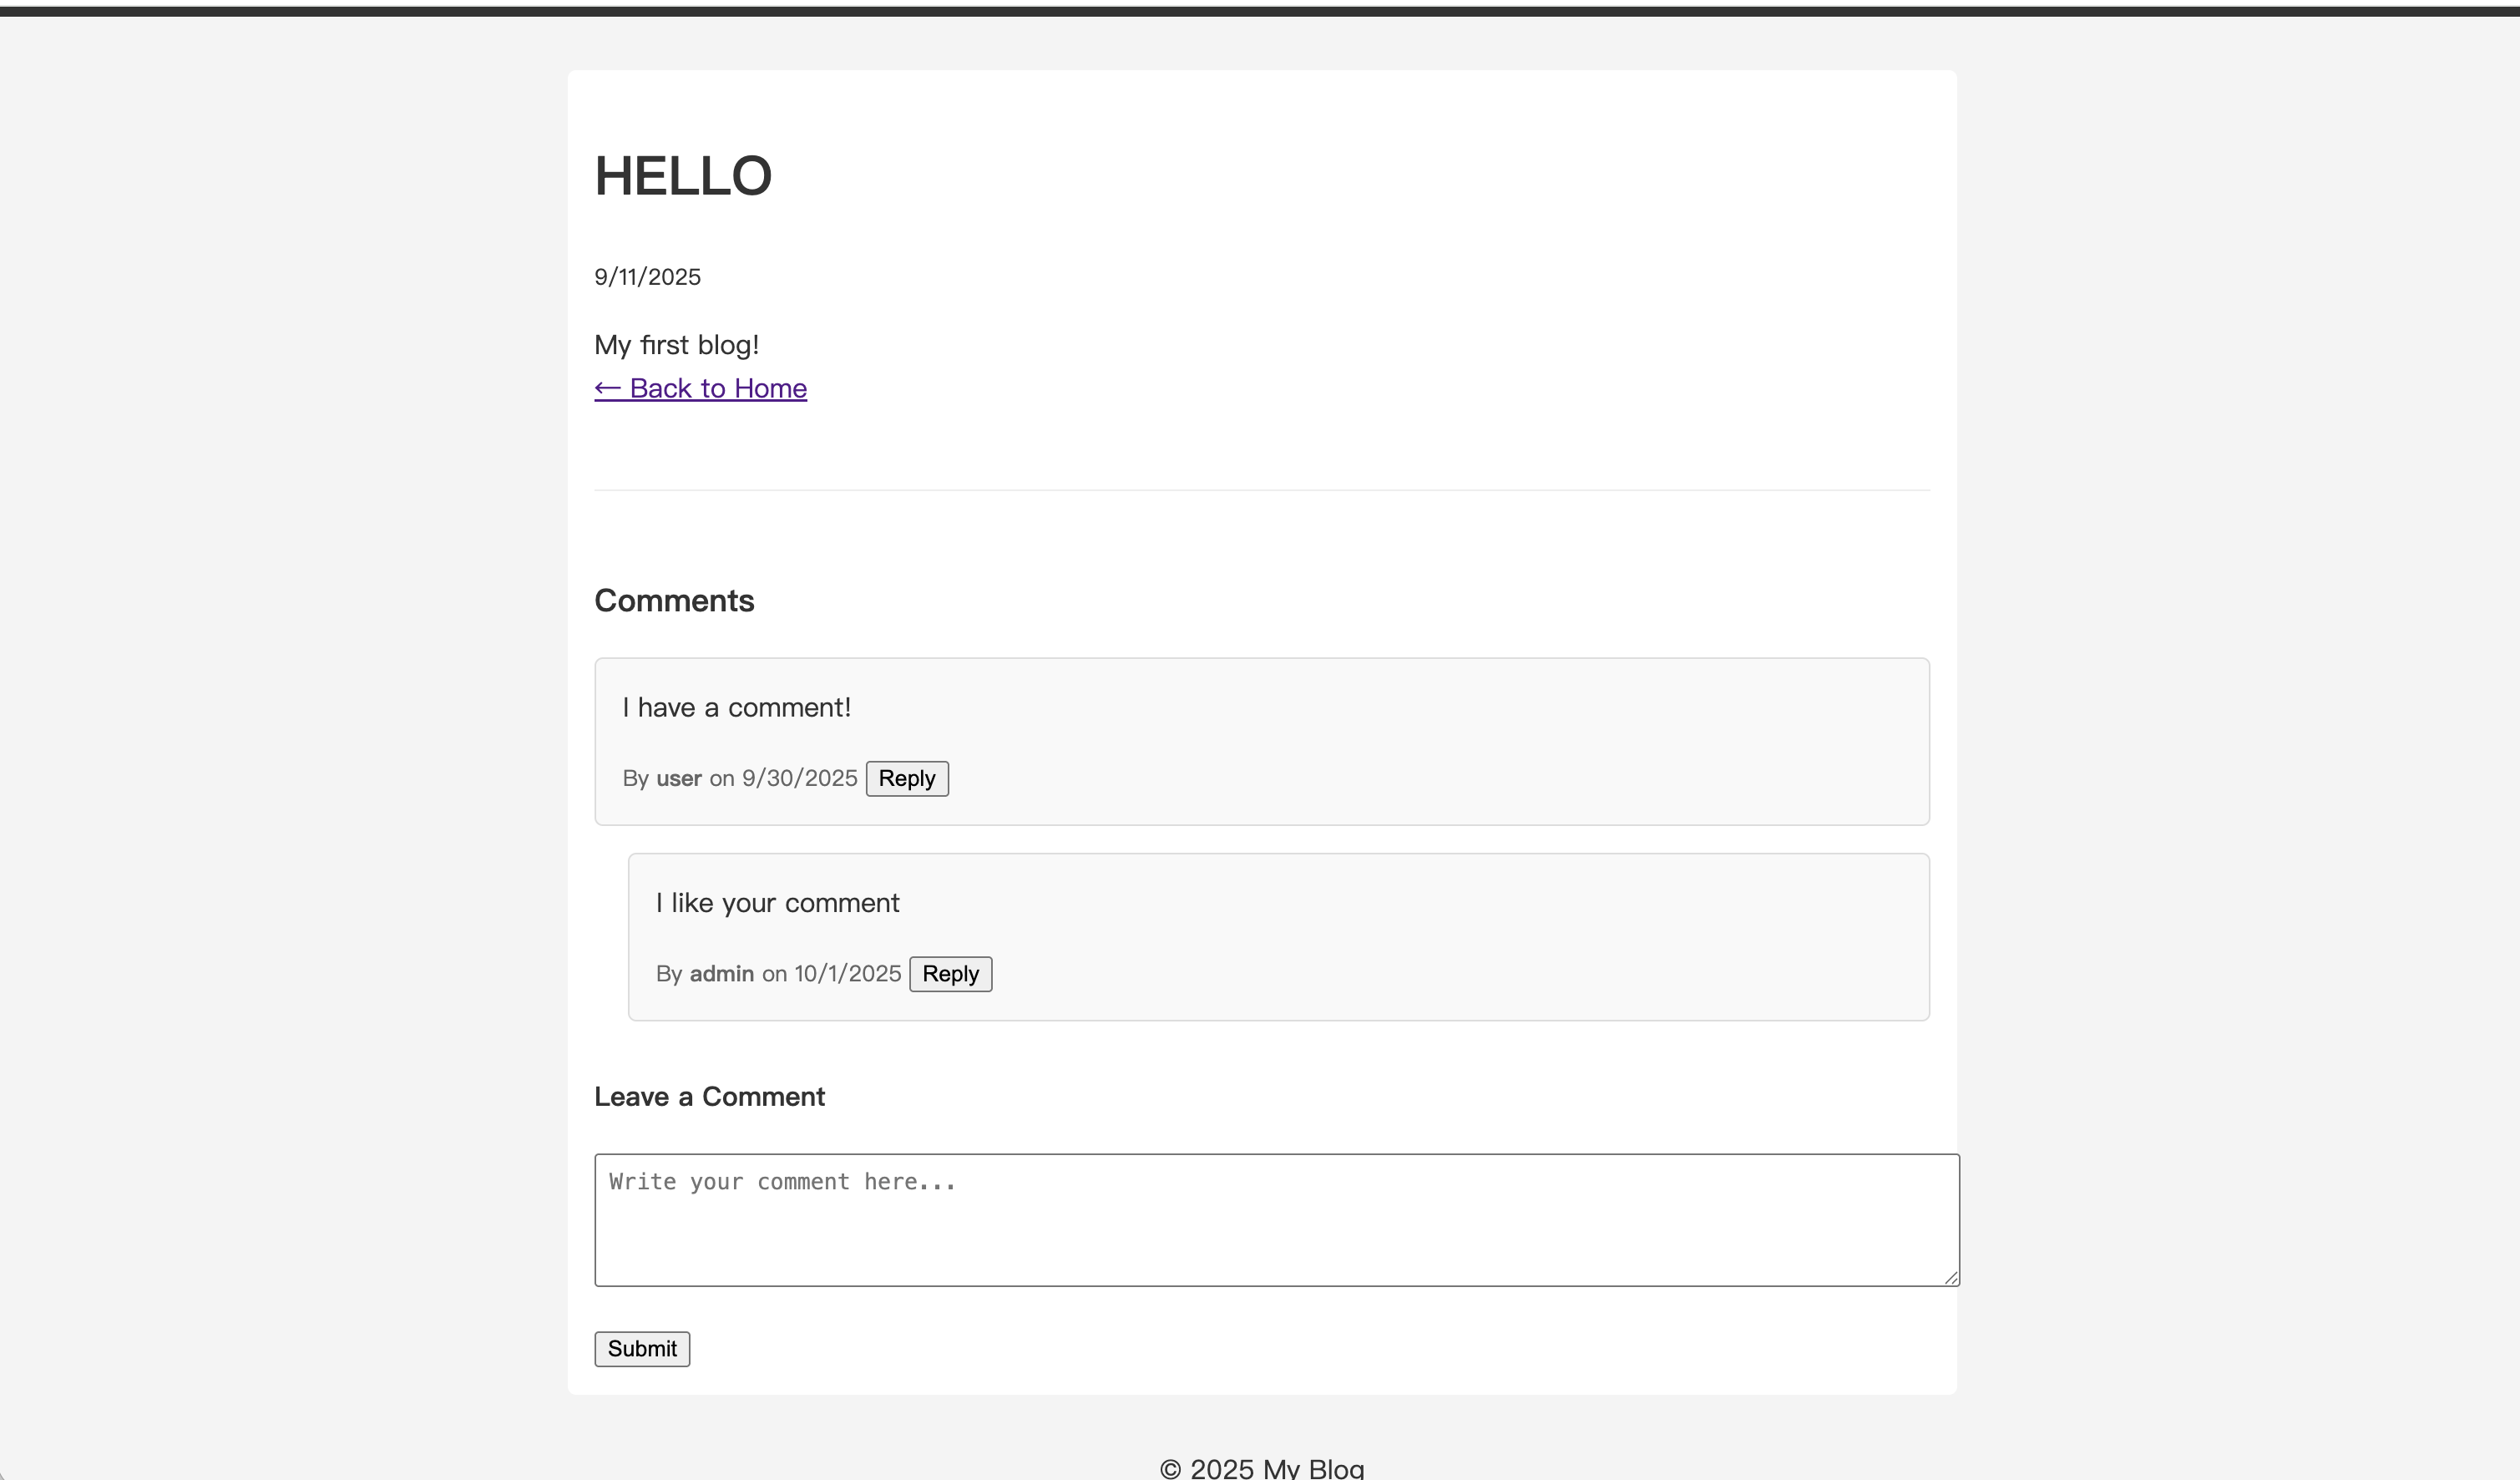
返信に返信を続けることができ、複数の会話レベルを作成できます。
これで、完全なコメント返信システムが完成しました。
過去のチュートリアル: